Precise metal machining creates new challenges for engineers and machinists to achieve maximum precision and surface quality on workpieces. However, precision doesn’t just start at the machine tool, but is instead begins earlier in the manufacturing process — with the perfectly preset tool.
This precision allows for almost no deviation in component manufacturing tolerances because even the smallest deviation can result in scrap. In order to fulfill high-finishing demands, preset tools like drills, reamers, milling tools, or grinding wheels must be kept to high tolerances.
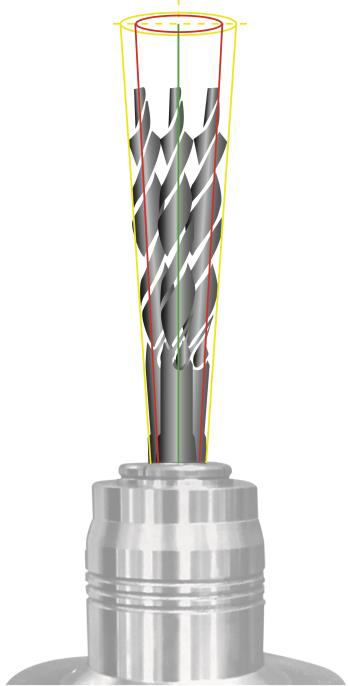
Despite high precision, machine spindles show both wobble issues and a certain lack of concentricity. These are not errors in a traditional sense, but are rather part of the nature of the project and must be compensated for as much as possible. How is done? First, the concentrity and wobble issues on the machine spindle are recorded and saved to the associated zero point on the ZOLLER presetting and measuring machine.
The function “Machine concentricity/wobble compensation” in »pilot 3.0« image processing software is used to simulate the actual situation on the device with the presetting and measuring machine, allowing the worker to preset the tool in question precisely, to the µm, in consideration of these conditions. The requirement for doing so is that the tool holder system (chuck) can be adjusted within these parameters, compensating for this residual error in the machine spindle and counteracting it using the settings of the tool holder in question. This means the tool is always compensated for using the concentricity of the machine, guaranteeing correct processing of the workpieces.
The software function in the »pilot 3.0« image processing software for concentricity and wobble compensation, automatically recalculates the central tool axes of tools. The software offers users intuitive operation, and the measuring procedure occurs automatically, minimizing the risk of operating errors. The newly calculated center axis is used as a reference for further diameter, run out and length measurements. Two measuring points, for instance on a cylindrical tool shank or on a test surface of a mandrel gauge, are established for this purpose and saved to the tool. Reversal measurement is also possible. If a tool with activated concentricity and wobble compensation is selected and clamped into a ZOLLER presetting and measuring machine, the concentricity and wobble compensation can be completed before the measuring process and the newly calculated center axis can be used for all other measurements. This saves time and results in better productivity. The concentricity and wobble compensation is independent of the measurement program and can be activated for every tool that has a suitable cylindrical surface.
Adjustable reamers can be used to produce workpieces that stand out for their outstanding economic efficiency, excellent manufacturing tolerances, and distinguished surface qualities — all while providing very long service lives. In the automotive and supplier industries in particular, adjustable reamers have been used for many years and must meet the highest requirements for precision and economic efficiency. However, they can only achieve these benefits if set correctly.
ZOLLER offers two presetting and measuring machines for the modern and highly precise setting of reamers: »phoenix« and »reamCheck«. Both solutions can be used to preset not only reamers but also all kinds of cutting tools. Thanks to additional equipment features like a tailstock, even very long and delicate tools can be set reliably. Both solutions guarantee the best possible precision, longer service lives for the cutting tool edges, and reduced tool costs.
The ZOLLER specialist, »reamCheck«, is equipped with our trusted ZOLLER »pilot 3.0« image processing software and with two additional electronic measuring sensors. Some users prefer to complete adjustments on a tactile basis, in particular to measure oversized reamers. In general, presetting processes using image processing are preferred, since the danger of damaging the cutting inserts, in particular on sensitive blade materials, is completely avoided.
When using especially long and thin reamers, the »phoenix« presetting and measuring machine, equipped with a pneumatically supported tailstock, is the ideal solution. Round workpieces or long, thin tools can be mounted using a centered tailstock (counter-bearing) or between centers. The ergonomic single-hand operating device allows the tailstock to be positioned comfortably to the required position. The purpose of the tailstock is to ensure that the tool is guided precisely during the presetting process and cannot be “deformed.” This means reamers can be set and measured with μm precision, fully automatically and without damage.
ZOLLER presetting and measuring machines offer a large number of additional standard software functions, such as: Concentricity testing, wobble compensation, review of support strip status, and the option to subject any specialized tools to a contour test without using additional presetting and testing gauges.
Even multi-stage and complex multifunctional reamers can easily be created and measured fully automatically using the smart combination of existing standard measurement programs for reamers. The requirements of special reamers like conical reamers, valve seat reamers, or externally finished reamers are standard functions in the ZOLLER software.
Especially when working on finishing processes in tool and mold making, additional measuring programs like “radius contour” can be used to test the shape accuracy and radius quality of toroidal, radius, and die tools. This includes an automatic determination of the quality of the tools and a graphical evaluation of the total contour of the cutting tool edge. The contour is divided into individual measuring points and a mean value for the actual radius is calculated. The radius is precisely measured and evaluated across all segments. This ensures that a tool that is used in specialized, highly complex molds “keeps working correctly down to the last grind,” and will avoid expensive polishing work.
Preset and measured tool data can be transmitted directly to the machine controller. There are various ways to do this depending on the manufacturing requirements: via label and ZOLLER »zidCode« identification code, RFID chip, post-processor, or higher-level manufacturing control systems. One new option is encryption in a data matrix code, which is scanned from the label with a reader connected to the CNC machine controller. Data transfer via RFID chip is just as easy: A tool identification unit on the presetting and measuring machine can write actual tool data onto a RFID chip, allowing it to be read in automatically by the machine tool. Furthermore, there is the option of preparing the data for the controller via post-processor, then transmitting it to the machine controller with the click of a mouse. This guarantees precision not only before the machine but on the machine tool itself.
Contact Details
Related Glossary Terms
- centers
centers
Cone-shaped pins that support a workpiece by one or two ends during machining. The centers fit into holes drilled in the workpiece ends. Centers that turn with the workpiece are called “live” centers; those that do not are called “dead” centers.
- computer numerical control ( CNC)
computer numerical control ( CNC)
Microprocessor-based controller dedicated to a machine tool that permits the creation or modification of parts. Programmed numerical control activates the machine’s servos and spindle drives and controls the various machining operations. See DNC, direct numerical control; NC, numerical control.
- gang cutting ( milling)
gang cutting ( milling)
Machining with several cutters mounted on a single arbor, generally for simultaneous cutting.
- grinding
grinding
Machining operation in which material is removed from the workpiece by a powered abrasive wheel, stone, belt, paste, sheet, compound, slurry, etc. Takes various forms: surface grinding (creates flat and/or squared surfaces); cylindrical grinding (for external cylindrical and tapered shapes, fillets, undercuts, etc.); centerless grinding; chamfering; thread and form grinding; tool and cutter grinding; offhand grinding; lapping and polishing (grinding with extremely fine grits to create ultrasmooth surfaces); honing; and disc grinding.
- mandrel
mandrel
Workholder for turning that fits inside hollow workpieces. Types available include expanding, pin and threaded.
- milling
milling
Machining operation in which metal or other material is removed by applying power to a rotating cutter. In vertical milling, the cutting tool is mounted vertically on the spindle. In horizontal milling, the cutting tool is mounted horizontally, either directly on the spindle or on an arbor. Horizontal milling is further broken down into conventional milling, where the cutter rotates opposite the direction of feed, or “up” into the workpiece; and climb milling, where the cutter rotates in the direction of feed, or “down” into the workpiece. Milling operations include plane or surface milling, endmilling, facemilling, angle milling, form milling and profiling.
- polishing
polishing
Abrasive process that improves surface finish and blends contours. Abrasive particles attached to a flexible backing abrade the workpiece.
- shank
shank
Main body of a tool; the portion of a drill or similar end-held tool that fits into a collet, chuck or similar mounting device.

