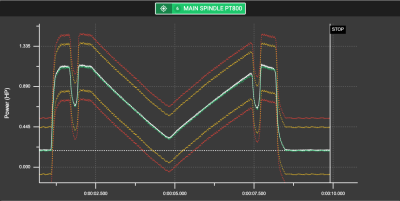
Caron Engineering has a new signature analysis feature for CNC machining to accurately monitor the exact path of a tool in cut. This is a new feature added to their product line in both their TMAC (adaptive tool monitoring system) and DTect-IT (sensor/software monitoring suite) products. For constant surface speed cutting operations, which have historically been difficult to monitor due to the varying spindle RPM as material is removed, this capability is specifically beneficial.
Signature analysis allows monitoring these cutting processes where the material diameter changes consistently during a cut. The RPM varies as the material increases or decreases causing sensor fluctuations unrelated to the tooling. To monitor these cutting operations, the signature analysis software learns the entire path (signature) of a cut using any sensor type. The user will define boundaries around this signature, both above and below it. These boundaries define a window that the signature must stay within to satisfy a good cut. If any portion of the signature of a monitored tool extends beyond the upper or lower boundary, then an alarm is generated. It is a time-based analysis, so a consistent start time matching the cutting start time is crucial to success.
In manufacturing, this applies to such constant surface speed cutting as facing and turning operations on a CNC lathe, where the RPM is being adjusted automatically to maintain a proper chip load. The lathe starts cutting at the original diameter of the part and as it removes material, the diameter is consistently decreasing. Those RPM changes cause a spike in power which is difficult to monitor with typical tool monitoring. By learning the signature of the cut and setting boundaries around the learned signature, these cuts can be accurately monitored to ensure optimal surface finish.
“Signature analysis is not strictly used for constant surface (speed) cutting but can be applied to other areas of machine tool monitoring as well. There are situations when a customer wants to know when material is missing during a cut. With the other technologies we only know if this occurs early in the cut. Using signature analysis, we can determine missing material anywhere in the cut,” said Rob Caron (PE), President of Caron Engineering.
Contact Details
Related Glossary Terms
- computer numerical control ( CNC)
computer numerical control ( CNC)
Microprocessor-based controller dedicated to a machine tool that permits the creation or modification of parts. Programmed numerical control activates the machine’s servos and spindle drives and controls the various machining operations. See DNC, direct numerical control; NC, numerical control.
- lathe
lathe
Turning machine capable of sawing, milling, grinding, gear-cutting, drilling, reaming, boring, threading, facing, chamfering, grooving, knurling, spinning, parting, necking, taper-cutting, and cam- and eccentric-cutting, as well as step- and straight-turning. Comes in a variety of forms, ranging from manual to semiautomatic to fully automatic, with major types being engine lathes, turning and contouring lathes, turret lathes and numerical-control lathes. The engine lathe consists of a headstock and spindle, tailstock, bed, carriage (complete with apron) and cross slides. Features include gear- (speed) and feed-selector levers, toolpost, compound rest, lead screw and reversing lead screw, threading dial and rapid-traverse lever. Special lathe types include through-the-spindle, camshaft and crankshaft, brake drum and rotor, spinning and gun-barrel machines. Toolroom and bench lathes are used for precision work; the former for tool-and-die work and similar tasks, the latter for small workpieces (instruments, watches), normally without a power feed. Models are typically designated according to their “swing,” or the largest-diameter workpiece that can be rotated; bed length, or the distance between centers; and horsepower generated. See turning machine.
- turning
turning
Workpiece is held in a chuck, mounted on a face plate or secured between centers and rotated while a cutting tool, normally a single-point tool, is fed into it along its periphery or across its end or face. Takes the form of straight turning (cutting along the periphery of the workpiece); taper turning (creating a taper); step turning (turning different-size diameters on the same work); chamfering (beveling an edge or shoulder); facing (cutting on an end); turning threads (usually external but can be internal); roughing (high-volume metal removal); and finishing (final light cuts). Performed on lathes, turning centers, chucking machines, automatic screw machines and similar machines.
