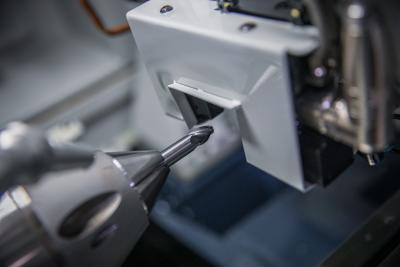
ANCA leads the market in inventing, developing, and offering its customers the latest technology to realize the benefits of automation and lights out manufacturing. LaserUltra is the next generation of the highly popular LaserPlus, an in-process measurement technology only available with ANCA that gave customers the power to operate unmanned overnight with confidence they could retrieve their finished tools the next day within specification. LaserPlus was itself a game changer for the industry and already significantly faster than external tool measurement processes.
The 70% reduction in measurement time compared to Laser Plus is achieved through the new Analog measurement. The Analog measurement is a continuous edge scan instead of number of digital points along the cutting edge. This process also eliminates variations caused by machine standing idle, errors due to manual wheel corrections and the requirement of skilled operators. In its place LaserUltra has increased accuracy, productivity, and reduction of scrap.
ANCA’s LaserUltra allows the measurement of tool geometries to tolerances of 0.002mm without removing the tool from the grinder, saving time in the manufacturing process, and ensuring maximum accuracy in measurement is maintained over large batch grinding.
Pat Boland, ANCA Co-Founder said: “The intersection of 5 axis milling machines, advanced CAD/CAM software and advanced profile geometry cutting tools is revolutionizing the Die and Mold and Aerospace machining industries. ANCA’s Laser Ultra tool measurement system together with RN34 software gives tool manufacturers all they need to manufacture complex profile endmills productively to outstanding accuracy.”
LaserUltra offers customers:
- a cycletime that is approximately 70% faster than LaserPlus in normal tool measurements which directly relates to increased productivity.
- Greater accuracy due to the continuous edge scan rather than a number of points.
- Several new ToolTypes like Barrel shape cutters and Lens shapes are included with LaserUltra measurement cycles.
- New operations like runout compensation and enhanced functions.
- Larger working envelop means larger diameters and length of tools can be measured.
- The measurement reports have been modified to suit customers’ requirements.
- Eliminates errors caused by manual compensation process.
Thomson Mathew, ANCA Software Product Manager said: “gone are the days of manual or external measurement and compensation for critical dimensions or profile forms due to wheel wear or other grinding factors as LaserUltra can measure and compensate within a couple of microns. All this is done in process without taking the tools out of the machine with complete control of process stability and capability. These measurements are displayed at various locations to give our customers complete visibility and trust in their grinding process.”
LaserUltra is an automatic OD, profile measurement and compensating system for ANCA’s TX, MX and FX machines. It is ideal for measuring and compensating tools to maintain tight tolerances (0.002mm) in unmanned production grinding. The in-process measurement is available in both digital and analog for fast and accurate measurements to enable productivity and performance improvements.
It is permanently mounted inside the machine and will not interfere with typical grinding processes and accessories. Using the laser, the operator can perform accurate in-process measurement and compensation without removing tools from the machine.
Thomson continues: “It gives customers flexibility to service multiple markets, supporting a large range of cutting tool applications, for example, all types of endmills or step tools -- including profile, compression routers and Threadmills and several more. Furthermore, different versions of LaserUltra can cover large diameter ranges and various lengths depending on user cases. And finally, LaserUltra can generate reports which can be configured depending on customers’ requirements.
Contact Details
Related Glossary Terms
- gang cutting ( milling)
gang cutting ( milling)
Machining with several cutters mounted on a single arbor, generally for simultaneous cutting.
- grinding
grinding
Machining operation in which material is removed from the workpiece by a powered abrasive wheel, stone, belt, paste, sheet, compound, slurry, etc. Takes various forms: surface grinding (creates flat and/or squared surfaces); cylindrical grinding (for external cylindrical and tapered shapes, fillets, undercuts, etc.); centerless grinding; chamfering; thread and form grinding; tool and cutter grinding; offhand grinding; lapping and polishing (grinding with extremely fine grits to create ultrasmooth surfaces); honing; and disc grinding.
- milling
milling
Machining operation in which metal or other material is removed by applying power to a rotating cutter. In vertical milling, the cutting tool is mounted vertically on the spindle. In horizontal milling, the cutting tool is mounted horizontally, either directly on the spindle or on an arbor. Horizontal milling is further broken down into conventional milling, where the cutter rotates opposite the direction of feed, or “up” into the workpiece; and climb milling, where the cutter rotates in the direction of feed, or “down” into the workpiece. Milling operations include plane or surface milling, endmilling, facemilling, angle milling, form milling and profiling.
- outer diameter ( OD)
outer diameter ( OD)
Dimension that defines the exterior diameter of a cylindrical or round part. See ID, inner diameter.

