If you have ever broached, you may not have given a second thought to machining with a broach that has a shear angle, or spiral gullet. More than likely, you were never given the option. When machining with a tool that has a shear angle on its cutting edge, the tool enters the workpiece with a lead corner and gradually increases engagement.
Many other types of cutting tools come standard with some kind of shear angle, even though their cutting properties are not the same as a shear on a broach. For example, virtually all endmills have spiral flutes.
Be aware that one tool design, such as a spiral flute, rarely fits all applications. Similar to other applications, when selecting the appropriate tool for a broaching application, cost is always a consideration. A spiral-gullet broach, which usually broaches internal part features, normally costs more than other types of broach tools. However, flat broach inserts that have a shear angle on their cutting teeth do not always cost more than broaches without the shear angle.
Shear Advantages
The first advantage to broaching with a spiral-gullet tool is that the tool continuously engages the part with the same number of teeth. As a result, the load on the machine tool stays constant, eliminating the fluctuation of the load against the machine. In contrast, a conventional button broach’s tooth engagement may go from two to three teeth and cause the force to increase 50 percent. With a spiral-gullet tool, the tooth engagement might be a constant 2.133333. A constant tooth engagement also reduces harmonics and chatter when broaching.
 T
T
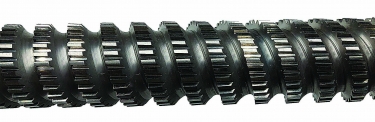
The cutting section of a spiral-flute broach. All images: Alliance Broach & Tool
he second advantage of a spiral-gullet broach is that there is more distance between each cutting tooth than with a conventional broach. The distance from one tooth’s cutting edge to the next is referred to as the pitch. A spiral broach may have a larger pitch because of the continuous engagement, so it will also have a larger land and, therefore, the ability to be sharpened more than a conventional broach.
Also, with the continuous engagement that the shear angle provides, more than one part can be broached at a time. The shear allows broaching multiple parts simultaneously because the stack of parts is held together by the pressure of the tool passing through it. This arrangement is possible only if the part geometry allows two or more parts to be stacked together end to end without an interrupted cut between the parts.
In addition, a spiral-gullet broach, with its larger pitch, may allow more aggressive cutting than a conventional broach because a spiral-gullet broach has more area between its teeth for the chips to be carried and evacuated out of the part without compacting them between the teeth and preventing evacuation.
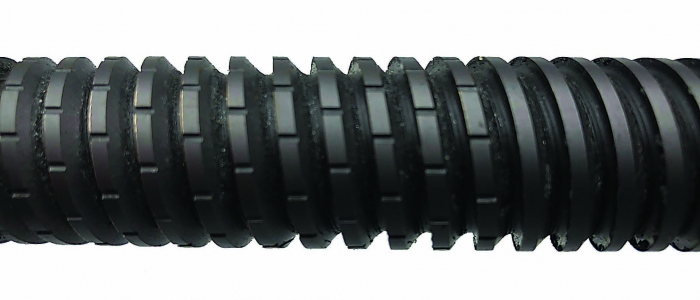
A spiral broach can cut a minor diameter of a part.
A similar comparison is with a high-helix endmill and a standard-helix endmill. The high-helix tool might cut smoother than the standard endmill, but it might not cut as aggressively.
One aspect that can be confusing when broaching with a spiral gullet is that the tool will act as if it has reduced the cutting force. Even though a spiral-gullet broach almost always cuts smoother than a conventional broach, be careful not to confuse smoother with easier. The psi needed to remove material will remain constant as long as the workpiece material properties remain the same, regardless of whether you’re turning, milling, drilling or broaching. One theory about why it seems easier to cut with a spiral flute or gullet is that the cutting force is displaced in more than one direction. Also, as previously mentioned, the cutting tooth engagement is constant when broaching with a spiral-gullet tool, adding to the illusion.
Going Without
On the flip side, with so many pros for broaching with a shear, what could possibly be the advantage of machining without one? Or what would be the disadvantage of a spiral-gullet broach other than it might initially cost more? When cutting a groove, there is a danger of the shear angle driving chips into one side of the groove. If that occurs, a large burr will form on one side of the groove as the tool exits the cut.
This burr would most likely be on the side of the groove or spline called the trailing side, meaning the last portion of the cutting edge that contacted this side. The trailing side of the cutting edge forms an acute angle against the side of the groove, whereas the leading side of the cutting edge forms an obtuse angle against the side of the groove. This condition always exists when broaching with a spiral-gullet tool. Make sure the tool is sharp to minimize burr formation.
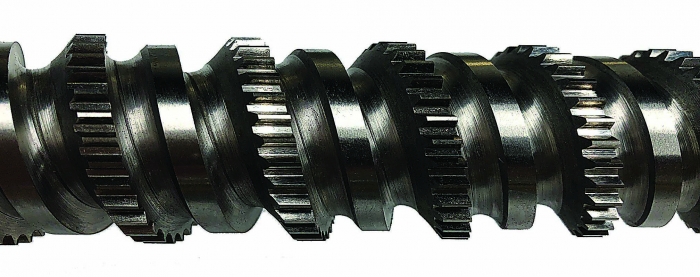
This used spiral broach shows that sometimes the smaller teeth don’t last as long as the larger ones.
If the broach is not applied properly, the condition could become extremely severe. It could actually start to tear the workpiece material as the chips start to build pressure against the side of the groove where the cutting edge forms an acute angle. The opposite condition would then exist on the obtuse side of the groove, where chips move away from the part.
If you are broaching a groove with a conventional tool, the cutting edge is always at a 90° angle to the side of the groove, and the burr will be equal on both sides of the groove. The pressure is then equal on both sides of the groove, and chips do not drag against the part.
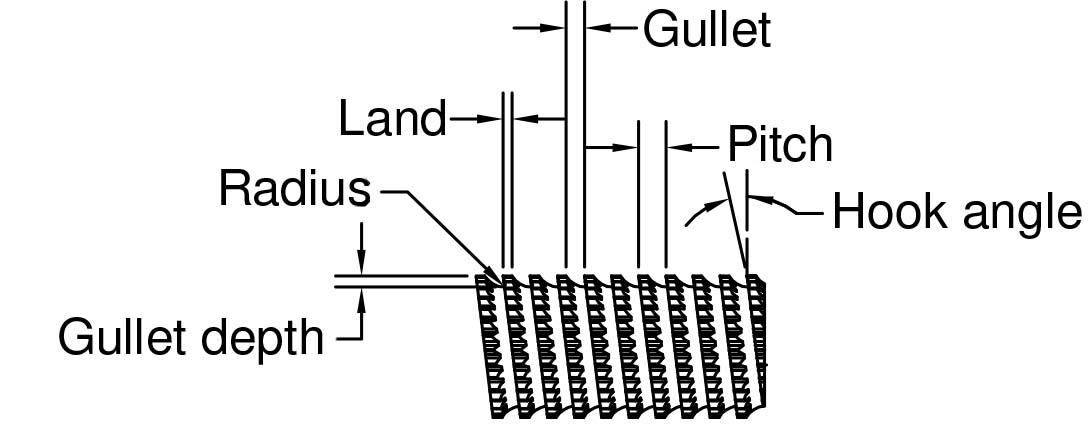
The geometric features of a spiral-gullet broach.
Because broaching with a conventional tool offers a cost advantage, a small-quantity job does not typically justify paying extra for a spiral-gullet broach. Even tool sharpening will cost more for a spiral-gullet tool.
Depending on the application, a conventional broach can perform as well as a spiral-gullet broach. This comparable performance usually occurs when the length of machining is long and the number of teeth engaged in the cut is large enough that the cutting force fluctuates less than 15 percent. For example, if the number of teeth engaged in a conventional tool fluctuates from seven to eight teeth, the force required to pull the broach through the part will fluctuate by only 12.5 percent.
As the machining industry continues to evolve, expect to see more small, incremental enhancements to broaches and other cutting tools. It is everyone’s responsibility to find these tools and apply them the best way possible.
Related Glossary Terms
- broach
broach
Tapered tool, with a series of teeth of increasing length, that is pushed or pulled into a workpiece, successively removing small amounts of metal to enlarge a hole, slot or other opening to final size.
- broaching
broaching
Operation in which a cutter progressively enlarges a slot or hole or shapes a workpiece exterior. Low teeth start the cut, intermediate teeth remove the majority of the material and high teeth finish the task. Broaching can be a one-step operation, as opposed to milling and slotting, which require repeated passes. Typically, however, broaching also involves multiple passes.
- burr
burr
Stringy portions of material formed on workpiece edges during machining. Often sharp. Can be removed with hand files, abrasive wheels or belts, wire wheels, abrasive-fiber brushes, waterjet equipment or other methods.
- chatter
chatter
Condition of vibration involving the machine, workpiece and cutting tool. Once this condition arises, it is often self-sustaining until the problem is corrected. Chatter can be identified when lines or grooves appear at regular intervals in the workpiece. These lines or grooves are caused by the teeth of the cutter as they vibrate in and out of the workpiece and their spacing depends on the frequency of vibration.
- cutting force
cutting force
Engagement of a tool’s cutting edge with a workpiece generates a cutting force. Such a cutting force combines tangential, feed and radial forces, which can be measured by a dynamometer. Of the three cutting force components, tangential force is the greatest. Tangential force generates torque and accounts for more than 95 percent of the machining power. See dynamometer.
- endmill
endmill
Milling cutter held by its shank that cuts on its periphery and, if so configured, on its free end. Takes a variety of shapes (single- and double-end, roughing, ballnose and cup-end) and sizes (stub, medium, long and extra-long). Also comes with differing numbers of flutes.
- flat ( screw flat)
flat ( screw flat)
Flat surface machined into the shank of a cutting tool for enhanced holding of the tool.
- flutes
flutes
Grooves and spaces in the body of a tool that permit chip removal from, and cutting-fluid application to, the point of cut.
- gang cutting ( milling)
gang cutting ( milling)
Machining with several cutters mounted on a single arbor, generally for simultaneous cutting.
- interrupted cut
interrupted cut
Cutting tool repeatedly enters and exits the work. Subjects tool to shock loading, making tool toughness, impact strength and flexibility vital. Closely associated with milling operations. See shock loading.
- land
land
Part of the tool body that remains after the flutes are cut.
- milling
milling
Machining operation in which metal or other material is removed by applying power to a rotating cutter. In vertical milling, the cutting tool is mounted vertically on the spindle. In horizontal milling, the cutting tool is mounted horizontally, either directly on the spindle or on an arbor. Horizontal milling is further broken down into conventional milling, where the cutter rotates opposite the direction of feed, or “up” into the workpiece; and climb milling, where the cutter rotates in the direction of feed, or “down” into the workpiece. Milling operations include plane or surface milling, endmilling, facemilling, angle milling, form milling and profiling.
- pitch
pitch
1. On a saw blade, the number of teeth per inch. 2. In threading, the number of threads per inch.
- turning
turning
Workpiece is held in a chuck, mounted on a face plate or secured between centers and rotated while a cutting tool, normally a single-point tool, is fed into it along its periphery or across its end or face. Takes the form of straight turning (cutting along the periphery of the workpiece); taper turning (creating a taper); step turning (turning different-size diameters on the same work); chamfering (beveling an edge or shoulder); facing (cutting on an end); turning threads (usually external but can be internal); roughing (high-volume metal removal); and finishing (final light cuts). Performed on lathes, turning centers, chucking machines, automatic screw machines and similar machines.
Author

Michael Johnson is president of Alliance Broach & Tool, East China, Michigan. For more information about the company’s broaching tools, visit www.alliancebroach.com or call (810) 765-5755.