In the early 1900s, a British company called Sheffield developed the first air gages to measure automotive parts. By firing pressurized air through a probe inserted into a bore, the gage measured the airflow, compared it to a fixed amount of air flow and reflected the difference with a floating bobber in a glass tube.
Today, there are different approaches to air gaging, each with distinct pros and cons, and the data collected can be captured electronically. Whether measuring IDs or ODs, air gaging systems provide accurate, noncontact measurement.
Go with the Flow
The original air gages, known as flow gages, were based on a still-valid technology that has, nonetheless, been rendered virtually obsolete, replaced by backpressure gaging methods.
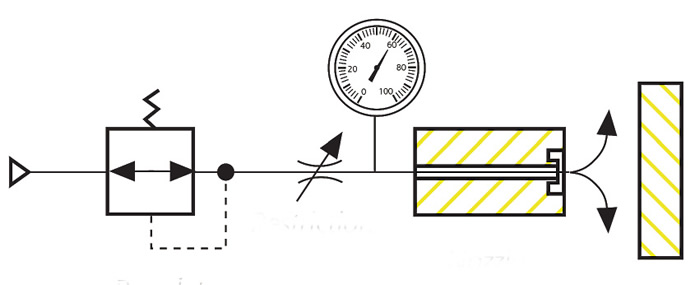
“Think of a garden hose that’s spewing water out the end,” said Jack Gaughan, vice president of Edmunds Gages, Farmington, Conn., in explaining air gaging. “If you put your thumb over that hole, the hose grows in size. As you take your thumb away, this releases the pressure and the hose shrinks in size. That’s the basic premise behind air gaging. You can either look at it in terms of backpressure—how much the hose grows when you restrict the water—or in terms of how much is allowed to flow out.”


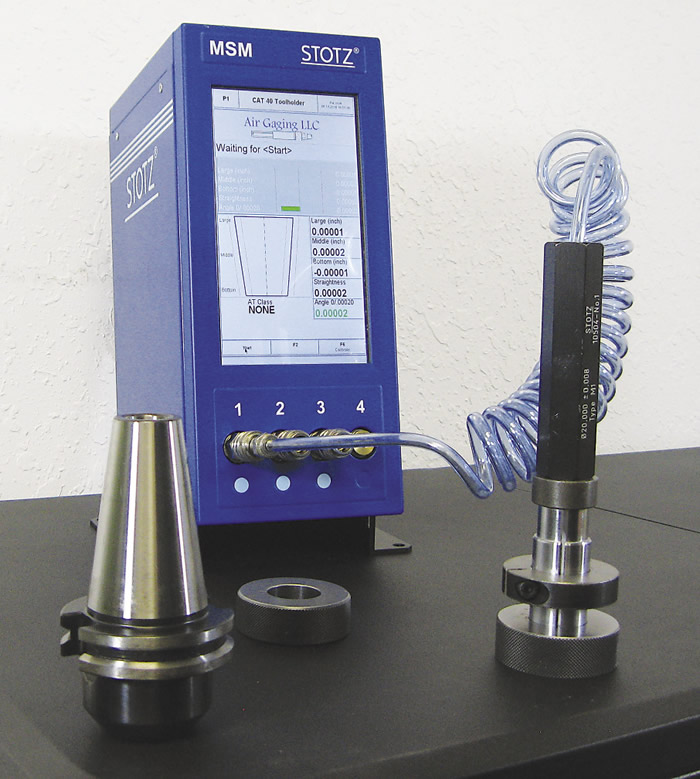
Stotz offers dual-master air gaging systems, which offer the flexibility of certifying across the entire tolerance range. Image courtesy Air Gaging.

According to Don Moors, president and CEO of Western Gage Corp., Camarillo, Calif., flow and backpressure are the two main categories of air gages, though the backpressure type encompasses several varieties.
“A significant part of the air gage business since I got involved in it around 1969 was the Sheffield flow gages, but backpressure has come to basically mean ‘everything else,’” Moors said. “Flow gage sales were probably better than 50 percent of the business for a long time, but are down to about 1 percent now.”
Back(pressure) to the Future
Backpressure gaging is roughly split into three categories. Single-master, or differential, systems take air into the amplifier and split it in two directions; one stream goes to the tool, while the other one goes to a fixed orifice in the amplifier. The master, a nominally sized part that fits onto the tool, equalizes the pressure in both legs of the airflow. When the tool is applied to a part for measurement, the calculation is based on the differential between the airflow to the part and the airflow to the fixed orifice.
The advantage of that type of system is that it’s extremely simple to use; however, a dual-master gage is more versatile, because it allows the user to specify the minimum and maximum tolerances, according to Chris Koehn, president of Air Gaging LLC, a Freeport, Ill.-based reseller of Stotz dual-master air gages.
“Other companies have different approaches,” he said, “but Stotz has had the most success with a dual-master system. The advantage is that this system certifies across the entire tolerance range, whereas with single master, you’re not actually certifying at the upper- and lower-tolerance limit, only at the nominal value.”
The third main category of backpressure gage is the two-master variant known as backpressure bleed. It offers even more versatility than single- and other dual-master systems, explained Edmunds’ Gaughan.


Air gaging works by forcing compressed air through a nozzle and measuring either how much air is able to flow out or how much air is kept in the circuit (backpressure). Illustration courtesy Edmunds Gages.

“With both differential and backpressure air gages, the tool has to be made to match an orifice in the amplifier, meaning that if you want to measure to a 0.001" tolerance, you need an amplifier that can display a 0.001" spread, and you have to have a tool made for that amplifier,” he said. “If you have another hole with a 0.005" tolerance of the same nominal size specified, you need a completely different amplifier and a completely different tool made for that new
tolerance. With a backpressure bleed system, the air is adjustable and there’s no fixed orifice in the amplifier, so you can adjust a tool that’s made for a 0.005" range and simply readjust the amplifier to make that same tool display a 0.001" tolerance.” This means shops need fewer amplifiers and fewer tools, he explained. The “bleed” in the system’s name refers to the excess air that can be bled off to meet different tolerance requirements.
Air Advantage
Air gaging has a number of inherent advantages, according to Air Gaging’s Koehn. “It’s very fast and very repeatable, it’s noncontact, so you aren’t marking the parts, and it has a cleaning effect insomuch as the air will dissipate any oil or coolant left in the part.”
Ken Loria, owner of Douglas Gage Inc., Richmond, Mich., seconded Koehn’s endorsement, while citing additional advantages of air gaging.
“Every company has their style of how they come up with the calculations, but in my opinion, there’s no measurement method better than air gaging,” he said. “There are some engine manufacturers who will actually use a honing head that has air jets in it so that while the stone is honing the hole, it’s feeding information to the machine and the machine can use that air gaging information to adjust the honing process to get the dimensions exactly right.”
However, no method is perfect, and air gaging is no exception. Some situations simply do not lend themselves well to air gaging.
Probes with diameters smaller than what Edmunds offers are available, Gaughan said, “but, in our case, we are only able to go down to a 0.078"-dia. probe. We simply don’t have the tooling or machinery to manufacture any smaller.”
On the other side of the spectrum, Edmunds manufactures gages that can measure up to 6" (152.4mm) in diameter, though, again, that is limited only by the manufacturing capability of the supplier. Gaughan is aware of manufacturers making probes 0.05" (1.27mm) or smaller, and, in the past, has personally worked on gages as big as 40" (1,016mm) in diameter, but those specialized sizes require specialized machinery.
Tolerance and surface finish are also important when considering air gaging. Parts with tolerances looser than 0.005" (0.127mm) do not typically allow for enough air pressure to gather an accurate reading, while rough surface finishes—worse than 60 rms—do not lend themselves well to the noncontact nature of air gaging.
“Because we’re not making contact, if you have a very rough surface finish, our measurement will be the average between the peak and the valley of the surface finish, which will not correlate properly to a contact gage, which will actually touch on the peaks,” said Air Gaging’s Koehn. “The worse the surface finish, the worse that deviation will be.”
Pushing Forward
People may think of air gaging as old technology because it’s been around for more than a century, but the technology has evolved and modern applications are far more advanced than the gages of yore would have allowed. For example, many air gage manufacturers offer an air-to-electronic converter. Edmunds’ Gaughan pointed out that the introduction of this technology was a key to modernizing air gaging.
“In today’s action-packed world, where people want data for SPC purposes and everything else, being able to capture the recording of the measurement without an operator having to write it down is bringing air gaging into the 21st century,” he said.


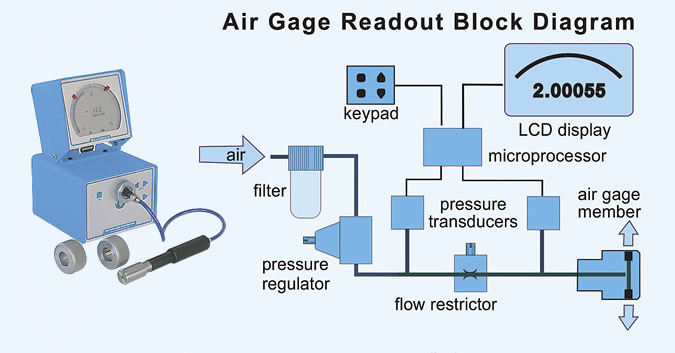
Western Gage’s MiliCheck gage (left) utilizes outputs from two transducers—one measuring backpressure from the nozzles, one monitoring regulator pressure—to eliminate errors related to supply pressure variations. Illustration courtesy Western Gage.

In addition, automated air gaging is increasingly popular, according to Sharon Garcia, who is involved in gage sales at Western Gage.
“If you’re running parts in a tightly controlled application, the air gage’s sensitivity to tolerance is going to be helpful from a QC standpoint, and the simplicity lends itself very well to an automated production line,” she said. “The technology itself may not have evolved that much, but the world around it has been developing and integrating this technology in very exciting ways.”
Western Gage’s Moors said many companies blend the best of both worlds by using a digital and analog hybrid readout, which allows novice and expert users to maximize gage data. Douglas’ Loria is one such user who appreciates the inclusion of analog technology.
“It’s kind of like black magic,” he laughed. “I can look at a print and say, ‘This is good for air,’ but I wouldn’t be able to quickly explain to someone else how to make that judgment. I know the technical terms, I know how to do it, but putting the actual act of air gaging into words is something that doesn’t come easily.”

Contributors
Air Gaging LLC
(888) 649-GAGE
www.airgaging.com
Douglas Gage Inc.
(586) 727-2089
www.douglasgage.net
Edmunds Gages
(860) 677-2813
www.edmundsgages.com
Western Gage Corp.
(800) 423-5062
www.westerngage.com
Related Glossary Terms
- coolant
coolant
Fluid that reduces temperature buildup at the tool/workpiece interface during machining. Normally takes the form of a liquid such as soluble or chemical mixtures (semisynthetic, synthetic) but can be pressurized air or other gas. Because of water’s ability to absorb great quantities of heat, it is widely used as a coolant and vehicle for various cutting compounds, with the water-to-compound ratio varying with the machining task. See cutting fluid; semisynthetic cutting fluid; soluble-oil cutting fluid; synthetic cutting fluid.
- statistical process control ( SPC)
statistical process control ( SPC)
Statistical techniques to measure and analyze the extent to which a process deviates from a set standard.
- tolerance
tolerance
Minimum and maximum amount a workpiece dimension is allowed to vary from a set standard and still be acceptable.

