Indexable drills offer significant advantages over conventional twist drills. With them, machinists can make holes at faster cutting speeds, change cutting edges more quickly, and, by selecting the appropriate insert, make holes in a wider variety of materials. Indexable drills can improve productivity and increase profits when machinists set them up and use them properly.
The use of indexable drills is generally limited to shorter hole depths. A maximum ratio of hole depth to drill diameter for conventional indexable drills is about 4:1. This means that a 1"-dia. drill can drill a hole 4" deep (4 x 1 =4").
When setting up an indexable drill for a hole within its depth range, the user must be careful to position the tool correctly in relation to the spindle and the workpiece, making sure that the centerlines of the drill and spindle are parallel.
In addition, radial runout, which is the measure of the tool’s misalignment in the radial direction, must be kept to a minimum. Radial runout alters the position of the inserts. This affects the inserts’ center height, which, for an indexable drill, depends on the position of the inserts’ cutting edge in relation to the spindle’s centerline. To maintain the correct center height, runout should not exceed 0.005".
Many drills can be offset to change the cutting diameter. In other words, the user can change the position of the drill so that the tool’s centerline no longer passes through the spindle’s centerline. On a lathe, this can be accomplished with a change in the cutting program. On a machining center, an adjustable holder or sleeve is required. When such an adjustment is made, the user must make sure the inserts’ center height does not change. For lathe operations, this means that the top surfaces of the inserts must remain parallel to the x-axis of the machine. For machining-center applications, the top surfaces must be parallel to the direction the tool is moved away from the spindle’s centerline (Figure 1).
Figure 1: When offsets or adapters are used with an indexable drill to change the diameter of the hole, the top surfaces of the inserts must remain parallel to the direction of the adjustment.
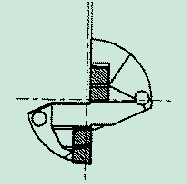
Figure 2: For optimal cutting and chip control, the inner insert of an indexable drill is set below the drill’s centerline.
When it is correctly set, an indexable drill’s inner insert is positioned slightly below the spindle’s centerline (Figure 2). This allows a small core of uncut material to pass over the top surface of the insert. When the material breaks off, it is carried away with the rest of the chips. If the inner insert is above center due to an alignment problem, this column of material is forced under the cutting edge along the insert’s flank. This results in the cutting edge chipping at the point where the edge crosses the spindle’s centerline.
Conversely, if the inner insert is too far below center, the diameter of the uncut core that forms will be excessively large. Such a large core can become an obstacle that prevents chips from passing up the drill flutes and out of the hole.
Another drill setup problem that can lead to poor drill performance and unacceptable hole quality is angular misalignment, where the centerlines of the drill and spindle are not parallel. When there are indications that the drill body is rubbing against the workpiece some distance behind the inserts, the user should suspect an alignment problem. Any misalignment between the drill and the hole becomes more pronounced as the depth of the hole increases. For example, if there is a 1° misalignment between the drill and spindle centerlines, the centerlines will be 0.017" apart 1" from the point at which the centerlines cross at the tip of the tool. This distance between the centerlines increases linearly as the distance from the intersection increases. At twice the distance from the intersection, the centerlines are twice as far apart (Figure 3).
Figure 3: With a 1° misalignment, the distance between the drill centerline and the spindle centerline increases linearly the further one measures from the point at which the centerlines cross (in this case, at the tip of the tool).
Any misalignment or off-center condition increases the risk of cutting-edge failure and insert breakage. Such damage poses a threat to the entire tool, because most indexable drills do not have shim seats under the inserts to take the brunt of the damage when an insert fails. On the other hand, good alignment increases the drill’s performance substantially. A properly aligned drill can be run at higher speeds and feed rates and still be more reliable than a poorly aligned drill. In addition, the hole’s dimensional stability and surface finish will improve significantly.
Gaging the Problem
Figure 3 shows a situation in which the drill’s misalignment does not throw the center height off because the drill and spindle centerlines meet at the drill’s point. When the intersection is not at the point of the drill, however, center-height problems will result. The cause of a misalignment might be found in the machine tool itself or in the adapters or bushings that the drill is mounted into before the entire assembly is mounted into the machine’s spindle. To avoid introducing problems in the middle of a job, the user should check the drill’s angular alignment and radial runout whenever an adapter or bushing is changed.
A switch to an indexable drill from a solid-carbide or HSS twist drill should make the user more conscious of the tool’s alignment and runout. Because conventional twist drills are more forgiving of off-center or angular-alignment problems, there is a chance that the degree of runout or misalignment in the existing setup will be more than the indexable drill can tolerate. If the conventional drill is being used on a drill press, the user will not be able to switch to an indexable drill. Because a drill press does not hold the same tolerances for runout and alignment as a lathe or a turning center, indexable drills are not recommended for use on these machines.
The most accurate way to gage alignment and runout on a machine is to measure the bore that will hold the drill’s shank. To make these measurements on a lathe, the user mounts an indicator in the machine’s spindle with the needle set on the wall of the bore as close as possible to the bore’s opening. TIR is measured while the spindle is rotated for one revolution. On a machining center, the indicator is mounted to the table with the needle in the spindle while the spindle is rotated. For acceptable indexable drill performance in either a lathe or a machining center, TIR should not exceed 0.005", and the axial runout in the bore should not exceed 0.009" per inch of overhang.
There is another method for gaging the drill’s position in the spindle, if the user knows the distance the drill’s center insert is set below the tool’s centerline. This method is quicker but less accurate, and it can only be used to determine the drill’s center height. It will not test for angular misalignment.
To gage by this method, the user first mounts the drill in the machine and drills a shallow test hole about ¼" deep at a light feed rate (0.002 ipr). This should be a blind hole, not completely through the part. If the drill is properly aligned, the hole diameter will fall within the tolerance listed by the drill’s manufacturer, and a core of material will be left at the center of the hole (Figure 4). The diameter of this core should roughly equal twice the amount that the inner insert is set below center. For example, if the inner insert is designed to be 0.008" below center, then the core diameter should be about 0.016". If no core is present, then the inner insert is probably above center and the user runs the risk of chipping the cutting edge. If the core diameter is more than 50% greater than the expected value, then the user may experience chip-control problems and poor tool life.
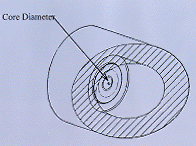
Figure 4: A properly set indexable drill will leave a core of material with a diameter measurement that is twice the distance the inner insert is set below the centerline.
If the core diameter falls within the expected range but the hole diameter is incorrect, this indicates that the drill is offset in a direction that is parallel to the inserts’ top surfaces. On a lathe, the user can correct this problem by setting offsets in the x-axis.
Corrective Action
The user will be able to correct some cases of misalignment or incorrect center height with simple adjustments to the tool or machine. In other cases, a corrective device will be needed. If the inner insert is on or slightly above center, the user can rotate the drill 180° in the adapter. This should place the inner insert slightly below center. Another test hole should be drilled to verify the correct cutting height.
An inner insert that is too far below center indicates a significant alignment problem that will require a larger adjustment. For the most accurate correction, the user should have the machine tool and adapters checked and realigned. Until these adjustments can be made, the user might try rotating the drill 90° counterclockwise in the adapter and using offsets in the x-axis to adjust the cutting height. This quick, short-term solution can only be used with lathe applications, however, and it will prevent the user from changing the drill’s cutting diameter by adjusting offsets on the machine.
The user can also choose from a number of devices on the market that allow the cutting diameter or center height of an indexable drill to be adjusted. These devices are especially useful on machining centers, which do not allow the user to set machine offsets to correct misalignment or center-height problems because the drill must always rotate around the spindle centerline. By using one of these devices on a lathe to adjust the drill’s center height, the user can correct an off-center situation and still adjust the cutting diameter with machine offsets.
These devices range from simple offset bushings or sleeves, which are rotated to adjust the centerline of the drill relative to the spindle, to more elaborate mechanisms, adjusted with dials or screws, that produce more accurate results. Some of these devices take the place of a standard drill adapter, while others fit between the drill and the adapter. The bushings or sleeves are designed to be used in both lathes and machining centers. Users install them on lathes to adjust center height while still allowing for hole-size adjustment through machine offsets. On machining centers, bushings or sleeves allow the user to adjust the cutting diameter. The dial-adjustable holders are self-contained and are mainly used on machining centers.
The amount of adjustment possible with these devices varies. Some units can adjust the drill’s position by as much as 0.060", while others may allow adjustments of only 0.016". These devices move the entire tool shank to make their adjustments; therefore, they can only correct center-height problems and not angular misalignments. Because adjustable bushings and sleeves use the flat on the drill’s shank as a reference point, they must be used with side-lock adapters to allow them to be rotated. The devices with self-contained adjusting mechanisms can be used with a wider variety of adapters, or in some cases, they may be used instead of the standard adapter.
To eliminate misalignment and center-height problems, the user will probably have to make some adjustments after the initial setup. Until optimal performance is achieved, the risk of a catastrophic insert failure that can damage the tool is increased. To reduce the risk of tool damage, the user should make holes with the toughest grade of insert available after the drill is first installed. If there are alignment problems, the tougher insert will resist breakage better than a harder grade. Once the drill is running properly, the user can switch to the wear-resistant grade that offers the best tool life. Most manufacturers offer a selection of inserts with different chip-control grooves to cover a wide range of materials. The optimal insert will vary with changes in material and hole depth.
Other Common Problems
Optimal drill performance depends on effective chip control as well as correct drill positioning. In drilling applications, chip evacuation is the greatest single factor influencing tool life. Poor chip evacuation can lead to restricted coolant flow, overheating of the drill body and inserts, chipping of the outer insert, and poor surface finishes on the drilled hole. Common signs of poor chip control include long, unmanageable chips, as well as a rumbling noise as the drill cuts and then recuts the chips. Other signs include a poor finish on the walls of the drilled hole (especially if the surface marring occurs at the hole’s lower depths) and signs of rubbing completely around the drill body. To solve chip-control problems, the user must find the best speed and feed rate within the range recommended by the manufacturer for the material being drilled.
Insufficient clearance between the drill body and the workpiece can be a problem when a drill mounted on a lathe is cutting a hole undersize. If this condition exists, the user might see evidence that the tool is rubbing against the hole wall down the entire length of the drill’s outer surface on the inboard flute. Left uncorrected, an undersize condition can lead to excessive heat, poor chip evacuation, and ultimately, drill failure. To eliminate an undersize condition, the user adjusts the cutting diameter so that it falls within the range specified by the manufacturer.
If drill inserts are chipping in areas other than where the inner insert crosses center, a number of problems may be indicated. Chipping can be caused by poor chip control, insufficient coolant flow, improper cutting conditions, insufficient tool rigidity, or an underpowered machine.
Some problems may be caused by unbalanced cutting while drilling into angled, round, or other uneven workpieces. Indexable drills are designed to cut with a balanced action while the drill’s entire diameter is engaged in the workpiece. The full diameter is not engaged, however, when a drill first penetrates an uneven workpiece surface. Until the tool has drilled to a depth that will allow its full diameter to be engaged, the drill will be unbalanced and the cut will be interrupted. To protect the drill’s cutting edges and maintain the quality of the hole, the user should reduce the feed rate by about 50% until the drill is fully engaged in the hole. The same precautions should be taken whenever the drill exits from anything other than a flat surface.
One way to lengthen tool life and improve the quality of nearly any holemaking operation is to use through-coolant drills. The coolant will help flush the chips out of the hole, improving surface finish and reducing problems that occur when the drill recuts unevacuated chips. In addition, the uninterrupted flow of coolant to the bottom of the hole will keep the inserts cooler, reducing the amount of flank wear. As coolant pressure increases, so does tool life and part quality.
With the use of indexable drills, a shop can enjoy improved productivity and increased profits through greatly reduced setup and machining times. However, the benefits will not be realized if the drill is not properly aligned. Spending some time to ensure proper setup will result in longer tool life and lower operating expenses.
About the Author
Brian Wilshire is senior applications engineer, Ceratip Cutting Tools, Kyocera Industrial Ceramics Corp., Mountain Home, NC.
Related Glossary Terms
- bushing
bushing
Cylindrical sleeve, typically made from high-grade tool steel, inserted into a jig fixture to guide cutting tools. There are three main types: renewable, used in liners that in turn are installed in the jig; press-fit, installed directly in the jig for short production runs; and liner (or master), installed permanently in a jig to receive renewable bushing.
- centers
centers
Cone-shaped pins that support a workpiece by one or two ends during machining. The centers fit into holes drilled in the workpiece ends. Centers that turn with the workpiece are called “live” centers; those that do not are called “dead” centers.
- ceramics
ceramics
Cutting tool materials based on aluminum oxide and silicon nitride. Ceramic tools can withstand higher cutting speeds than cemented carbide tools when machining hardened steels, cast irons and high-temperature alloys.
- clearance
clearance
Space provided behind a tool’s land or relief to prevent rubbing and subsequent premature deterioration of the tool. See land; relief.
- coolant
coolant
Fluid that reduces temperature buildup at the tool/workpiece interface during machining. Normally takes the form of a liquid such as soluble or chemical mixtures (semisynthetic, synthetic) but can be pressurized air or other gas. Because of water’s ability to absorb great quantities of heat, it is widely used as a coolant and vehicle for various cutting compounds, with the water-to-compound ratio varying with the machining task. See cutting fluid; semisynthetic cutting fluid; soluble-oil cutting fluid; synthetic cutting fluid.
- drilling machine ( drill press)
drilling machine ( drill press)
Machine designed to rotate end-cutting tools. Can also be used for reaming, tapping, countersinking, counterboring, spotfacing and boring.
- feed
feed
Rate of change of position of the tool as a whole, relative to the workpiece while cutting.
- flank wear
flank wear
Reduction in clearance on the tool’s flank caused by contact with the workpiece. Ultimately causes tool failure.
- flat ( screw flat)
flat ( screw flat)
Flat surface machined into the shank of a cutting tool for enhanced holding of the tool.
- flutes
flutes
Grooves and spaces in the body of a tool that permit chip removal from, and cutting-fluid application to, the point of cut.
- high-speed steels ( HSS)
high-speed steels ( HSS)
Available in two major types: tungsten high-speed steels (designated by letter T having tungsten as the principal alloying element) and molybdenum high-speed steels (designated by letter M having molybdenum as the principal alloying element). The type T high-speed steels containing cobalt have higher wear resistance and greater red (hot) hardness, withstanding cutting temperature up to 1,100º F (590º C). The type T steels are used to fabricate metalcutting tools (milling cutters, drills, reamers and taps), woodworking tools, various types of punches and dies, ball and roller bearings. The type M steels are used for cutting tools and various types of dies.
- lathe
lathe
Turning machine capable of sawing, milling, grinding, gear-cutting, drilling, reaming, boring, threading, facing, chamfering, grooving, knurling, spinning, parting, necking, taper-cutting, and cam- and eccentric-cutting, as well as step- and straight-turning. Comes in a variety of forms, ranging from manual to semiautomatic to fully automatic, with major types being engine lathes, turning and contouring lathes, turret lathes and numerical-control lathes. The engine lathe consists of a headstock and spindle, tailstock, bed, carriage (complete with apron) and cross slides. Features include gear- (speed) and feed-selector levers, toolpost, compound rest, lead screw and reversing lead screw, threading dial and rapid-traverse lever. Special lathe types include through-the-spindle, camshaft and crankshaft, brake drum and rotor, spinning and gun-barrel machines. Toolroom and bench lathes are used for precision work; the former for tool-and-die work and similar tasks, the latter for small workpieces (instruments, watches), normally without a power feed. Models are typically designated according to their “swing,” or the largest-diameter workpiece that can be rotated; bed length, or the distance between centers; and horsepower generated. See turning machine.
- machining center
machining center
CNC machine tool capable of drilling, reaming, tapping, milling and boring. Normally comes with an automatic toolchanger. See automatic toolchanger.
- numerical control ( NC)
numerical control ( NC)
Any controlled equipment that allows an operator to program its movement by entering a series of coded numbers and symbols. See CNC, computer numerical control; DNC, direct numerical control.
- parallel
parallel
Strip or block of precision-ground stock used to elevate a workpiece, while keeping it parallel to the worktable, to prevent cutter/table contact.
- shank
shank
Main body of a tool; the portion of a drill or similar end-held tool that fits into a collet, chuck or similar mounting device.
- tolerance
tolerance
Minimum and maximum amount a workpiece dimension is allowed to vary from a set standard and still be acceptable.
- total indicator runout ( TIR)
total indicator runout ( TIR)
Combined variations of all dimensions of a workpiece, measured with an indicator, determined by rotating the part 360°.
- turning
turning
Workpiece is held in a chuck, mounted on a face plate or secured between centers and rotated while a cutting tool, normally a single-point tool, is fed into it along its periphery or across its end or face. Takes the form of straight turning (cutting along the periphery of the workpiece); taper turning (creating a taper); step turning (turning different-size diameters on the same work); chamfering (beveling an edge or shoulder); facing (cutting on an end); turning threads (usually external but can be internal); roughing (high-volume metal removal); and finishing (final light cuts). Performed on lathes, turning centers, chucking machines, automatic screw machines and similar machines.
- twist drill
twist drill
Most common type of drill, having two or more cutting edges, and having helical grooves adjacent thereto for the passage of chips and for admitting coolant to the cutting edges. Twist drills are used either for originating holes or for enlarging existing holes. Standard twist drills come in fractional sizes from 1¼16" to 11¼2", wire-gage sizes from 1 to 80, letter sizes A to Z and metric sizes.