| Troubled by inaccurate part lengths? Workholding devices can be used in new ways to provide precise length control for lathe operations. |
Since Henry Hardinge developed the production method for making "true-hole" collets around the turn of the century, two basic styles have emerged: draw-in and push-to-close. Today, most CNC lathes, toolroom lathes, and lathes for precision machining use draw-in collets. This style is very accurate for holding part diameters concentric to the chucking diameter. The collet-closer drawbar pulls the collet directly into the spindle while the back bearing of the collet remains supported by the back bearing of the spindle. The small allowance between the spindle and the collet ensures concentricity.
For shouldered parts, however, draw-in collets do not hold part lengths very accurately in relation to the part shoulder, which locates against the collet face, step, or internal stop. Lathe operators spend a lot of time trying to overcome this inherent length-control problem. Since additional operations are often required to achieve precise lengths, much time and money is lost when part lengths are not controlled during the initial or secondary lathe operation.
Through the years, a variety of workholding devices have been developed to help minimize, and sometimes eliminate, the length-control problems associated with draw-in collets. There are literally hundreds of ways to make these devices, but they all boil down to a few basic methods. Once lathe operators understand how to apply these methods, precise length control will no longer be a problem.
   |
|
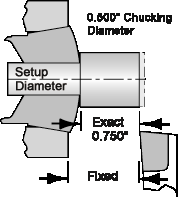
Figure 1: Variations on the chucking diameter of the part cause length-control problems. |
What’s the Problem?
Let’s look at the length-control problems related to a typical facing operation on a lathe using a draw-in collet (Figure 1). The collet grips the part’s 0.500" chucking diameter, which varies ±0.002". The only machining operation required is to face the part while holding the length from shoulder to face to ±0.001". The operator inserts the setup part in the collet and faces it to exactly 0.750" from the shoulder.
After making four pieces, the operator checks the fifth piece and finds that the shoulder length is 0.006" less than the setup piece and below the print specification. Upon checking the shoulder length of the other parts, he finds that the fourth is +0.003", the third is -0.001" (which is OK), the second is -0.002", and the first is fine. The chucking diameters are all within the ±0.002" print specification.
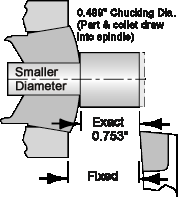
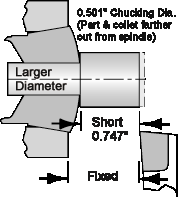
Why did the length vary? The collet, like all 5C, 16C, 20C, and 25C collets, has a 10° head angle. This angle determines how far the collet pulls back into the spindle before it grips the part. A 10Þ closing angle follows a 1-to-3 rule of thumb: For every 0.001" variation on the chucking diameter of a part, the finished length will vary 0.003" in relationship to the spindle face.
For example, if the 0.500" chucking diameter is reduced to 0.499", the collet will pull back into the spindle an additional 0.003" before firmly gripping the part. If the chucking diameter of the part is 0.501", the collet and part will remain 0.003" farther out than the 0.500"-dia. setup piece when the collet is fully closed around the part’s chucking diameter.
There are two fixed items in this setup: the spindle and the facing tool. Only the collet with the part moves. If the chucking diameter is pulled 0.003" farther into the spindle, the finished part will be 0.003" longer than the setup piece after facing. If the part extends 0.003" farther than the setup piece, it will be 0.003" shorter than the setup piece after facing.
Mike and Stack
A very common length-control method is "mike and stack." To hold the print lengths on a job, a lathe operator may "mike" the chucking diameter of each piece before machining and arrange all the parts with the same dimension on his work cart in stacks.
For example, take a part with a 0.500" chucking diameter that varies a total of -0.003". The part’s shoulder-to-face length tolerance is -0.002". The 1-to-3 rule of thumb dictates that the variation on the chucking diameter will result in a length variation of 0.009", which is unacceptable. Using the same rule, the operator determines that a -0.0005" variation on the chucking diameter will result in a 0.0015" length variation. This allows for a 0.0005" cushion within the 0.002" finish part-length tolerance. After measuring all the parts, he arranges them into six stacks with a variation of no more than 0.0005" between the largest and smallest chucking diameter in each stack (Figure 2).
The operator performs the initial setup using the part with the largest chucking diameter from the first group. He sets the facing tool to the low side of the print dimension’s tolerance, so that the part with the smallest chucking diameter will have a length that falls within the print tolerance. After finishing the first group, the operator goes on to the next group, gripping the part with the largest chucking diameter and resetting the facing tool the same way he did for the first group.
The mike-and-stack method of length control is not very precise or efficient. The operator has to perform six separate setups. If the chucking diameter had varied ±0.003" rather than -0.003", 12 setups would have been necessary. This can be done, but it is extremely time consuming.
What are the alternatives? The operator could have held a tighter tolerance on the chucking diameter during the first operation. This may have allowed him to hold the finish length tolerance in the second operation. However, the cost of holding the chucking diameter may increase the production cost considerably.
There is a variety of better methods for part-length control, ranging from simple fixture plates to more complex methods. All of these methods rely on the fixed spindle as a constant reference point. For precise length control, these methods locate the part directly against some portion of the spindle face or spindle seat, or against a device that locates against these surfaces. The fixture plate is the basis for all other length-control devices.
| Figure 2: To hold the 0.500" chucking diameter (A) to a tolerance of -0.003" and the 0.750" length (B) to a tolerance of -0.002" using the mike-and-stack method, the operator needs to perform six separate setups. | ||||||||||||||||||
|
There is a variety of better methods for part-length control, ranging from simple fixture plates to more complex methods. All of these methods rely on the fixed spindle as a constant reference point. For precise length control, these methods locate the part directly against some portion of the spindle face or spindle seat, or against a device that locates against these surfaces. The fixture plate is the basis for all other length-control devices.
Fixture Plates
A fixture plate is typically used as a base for fixturing irregularly shaped parts that cannot be held with a collet, step chuck, or jaw chuck. Another use is as a backing plate for a part that has a shoulder and a long chucking diameter.
To make this style of backing plate, first remove the flange from the fixture plate. Then hold the outer diameter of the fixture plate in a step chuck and counterbore the back face enough to clear the face of the collet when it is opened (Figure 3). Remove the step chuck and closer. Mount the collet, insert the part, and adjust the collet for the chucking diameter. Remove the part.
Next, mount the counterbored fixture plate to the spindle of the machine (5C plates are threaded or taper locked; 16C, 20C, and 25C plates are bolted onto the spindle). Rough drill and then finish bore and chamfer the hole. The bore should be 0.005" to 0.010" larger than the largest possible chucking diameter of the part. This is not a critical measurement as long as there is some clearance between the bore and the chucking diameter of all the parts. Lightly face the fixture plate to make sure it is perpendicular to the centerline of the spindle.
To use this backing plate, load the part through the backing plate into the collet and close the collet. As the collet closes, the part is drawn back against the face of the backing plate with a tremendous amount of force.
 |
Figure 3: A backing plate is the most basic method of length control. |
A backing plate is one of the best methods of holding part lengths. It can be used to help eliminate chatter, improve surface finish, and extend tool life in the machining of any part that has a shoulder and a long chucking diameter. A shouldered part typically cannot be successfully machined in a standard collet, because it is held only by radial closing forces. When a backing plate is used, the longitudinal force against the shoulder and the plate stabilizes the part, giving it much more rigidity against the pressure of the cutting tool. A part held in a collet does not have this advantage.
There is one major drawback of using a backing plate - the cost. The fixture plates that are modified to make this style of backing plate are expensive. A different one is required for each size part, even when the chucking diameter is only 1/64" larger, and they will not work with parts that don’t have long shanks. A stop plate overcomes the high cost of the backing plate with very little loss in efficiency.
Stop Plates
A stop plate is nothing more than a glorified hardened and ground washer. Commercial stop plates are available in sets of three with 1/8" bores. They are inexpensive, and they take up very little space for storage. A basic set can be made in 1/16" increments up to the maximum collet capacity.
To use a stop plate, first clean both sides of the plate and the face of the spindle. Push the part through the stop plate. Place the shank of the part in the collet, and push the whole assembly back firmly against the face of the spindle. Then close the collet. This action pulls the part and the stop plate firmly against the face of the spindle. The tremendous pressure exerted against the part’s shoulder when the collet closes helps eliminate tool chatter and provides maximum part stability.To make a stop plate, first counterbore the washer on one side large enough for the collet to open without touching the back of the plate (Figure 4). Grind the two faces of the plate parallel to each other. Then bore the stop plate 0.005" to 0.010" larger than the part’s chucking diameter.
Stop plates are excellent for short-run jobs (five to 25 pieces), but they are very time-consuming to use for machining large part quantities. The operator must take the time to thoroughly clean chips and dirt from both faces of the plate and the face of the spindle before machining each part. If this isn’t done, perpendicularity cannot be held accurately. Even lengths can vary, depending on the size of the chips that get between the spindle and the plate.
Another disadvantage of using a stop plate is that the operator must handle two pieces all the time. The part must be assembled in the stop plate and then in the collet. This can result in lost production time. A backing plate does not have this problem, because it is one solid piece mounted to the spindle: The operator simply cleans the face of the backing plate and inserts the part. These drawbacks to using stop plates can be overcome, however, with the use of a spindle mount, which gives a stop plate all the advantages of a backing plate at an extremely low cost.
Spindle Mounts
A spindle mount is either threaded or taper locked on a 5C spindle; it is bolted on a 16C (A2-5") spindle (Figure 5). To assemble the stop plate to the mount, first clean all surfaces. Then slide the part through the plate into the collet. Push and hold them against the face of the spindle, and close the collet. On a 5C mount, adjust the four taper-point screws to center the plate around the part. On a 16C mount, use the flat-point screws to center the plate (the set screws push the plate against the face of the spindle). Finally, open the collet and pull the part out 1/4" or more and finely adjust the plate to center.A spindle mount is used to hold a stop plate firmly against the spindle face. As long as parts with the same chucking diameter are being turned, the stop plate can remain in place. But when a new part with a different chucking diameter is to be turned, the stop plate can be removed, replaced, and centered in minutes. One spindle mount is used for an infinite number of stop plates with different bore sizes.
Holding It TogetherTo use a spindle-mounted stop plate, first clean the face of the stop plate and the shoulder of the part. Then open the collet. Load the part through the stop plate and push the part firmly against the plate. Close the collet. The stop plate locates against the face of the spindle, and the shoulder of the part locates against the face of the plate. Because chips cannot get between the face of the stop plate and the face of the spindle, the spindle mount provides precise length control for high production work.
The collet assembly shown in Figure 6 brings all the basic concepts together in one length-control device. The inner collet locates against the spindle face. The outer collet is pulled back by the collet closer. This action closes the outer collet down on the inner collet, gripping the part. This action also draws the inner collet firmly back against the face of the spindle.
The stop in the inner collet, along with the adapter in the outer collet, and the spring and nut hold the whole assembly together. When the collet closer moves forward to open the collet, the spring holds the face of the inner collet against the spindle face.
The spring adjustment is critical. If the spring is compressed too tightly, the whole assembly will be pushed forward when the collet is opened, moving the face of the inner collet away from the spindle face and allowing chips to fall in the gap. If there are problems holding lengths, this is the first thing to check. Back off the spring nut one turn and check again for inner-collet push-out.
Soft inner collets are used for short-run jobs, because they can be machined out to size to create a properly sized collet. First, insert pins in the appropriate holes in the face of the collet and adjust the collet closer until the pins cannot be moved with finger pressure (any tighter may distort the inner collet). Then machine the bore to the exact size of the chucking diameter of the part (the high side of its tolerance). After machining, remove the assembly from the spindle, take out the pins, and deburr the inner collet. Reassemble and mount the assembly back in the spindle. Adjust the closer to adequately grip the part.
Hardened and ground inner collets can be used instead of soft collets. The hardened collets do not need to be bored out, and they will last for years under normal machining conditions. Because they last longer than soft collets, hardened and ground collets are more suited for high-volume production or for frequently repeated jobs.
About the Author
Alan Baker is seminar coordinator and senior technical writer at Hardinge Inc., Elmira, NY. This article is based on excerpts from Precision Length Control - Draw-In Collets and Step Chucks, Publication HA-2285.
Related Glossary Terms
- backing
backing
1. Flexible portion of a bandsaw blade. 2. Support material behind the cutting edge of a tool. 3. Base material for coated abrasives.
- chatter
chatter
Condition of vibration involving the machine, workpiece and cutting tool. Once this condition arises, it is often self-sustaining until the problem is corrected. Chatter can be identified when lines or grooves appear at regular intervals in the workpiece. These lines or grooves are caused by the teeth of the cutter as they vibrate in and out of the workpiece and their spacing depends on the frequency of vibration.
- chuck
chuck
Workholding device that affixes to a mill, lathe or drill-press spindle. It holds a tool or workpiece by one end, allowing it to be rotated. May also be fitted to the machine table to hold a workpiece. Two or more adjustable jaws actually hold the tool or part. May be actuated manually, pneumatically, hydraulically or electrically. See collet.
- clearance
clearance
Space provided behind a tool’s land or relief to prevent rubbing and subsequent premature deterioration of the tool. See land; relief.
- collet
collet
Flexible-sided device that secures a tool or workpiece. Similar in function to a chuck, but can accommodate only a narrow size range. Typically provides greater gripping force and precision than a chuck. See chuck.
- computer numerical control ( CNC)
computer numerical control ( CNC)
Microprocessor-based controller dedicated to a machine tool that permits the creation or modification of parts. Programmed numerical control activates the machine’s servos and spindle drives and controls the various machining operations. See DNC, direct numerical control; NC, numerical control.
- counterbore
counterbore
Tool, guided by a pilot, that expands a hole to a certain depth.
- fixture
fixture
Device, often made in-house, that holds a specific workpiece. See jig; modular fixturing.
- lathe
lathe
Turning machine capable of sawing, milling, grinding, gear-cutting, drilling, reaming, boring, threading, facing, chamfering, grooving, knurling, spinning, parting, necking, taper-cutting, and cam- and eccentric-cutting, as well as step- and straight-turning. Comes in a variety of forms, ranging from manual to semiautomatic to fully automatic, with major types being engine lathes, turning and contouring lathes, turret lathes and numerical-control lathes. The engine lathe consists of a headstock and spindle, tailstock, bed, carriage (complete with apron) and cross slides. Features include gear- (speed) and feed-selector levers, toolpost, compound rest, lead screw and reversing lead screw, threading dial and rapid-traverse lever. Special lathe types include through-the-spindle, camshaft and crankshaft, brake drum and rotor, spinning and gun-barrel machines. Toolroom and bench lathes are used for precision work; the former for tool-and-die work and similar tasks, the latter for small workpieces (instruments, watches), normally without a power feed. Models are typically designated according to their “swing,” or the largest-diameter workpiece that can be rotated; bed length, or the distance between centers; and horsepower generated. See turning machine.
- outer diameter ( OD)
outer diameter ( OD)
Dimension that defines the exterior diameter of a cylindrical or round part. See ID, inner diameter.
- parallel
parallel
Strip or block of precision-ground stock used to elevate a workpiece, while keeping it parallel to the worktable, to prevent cutter/table contact.
- precision machining ( precision measurement)
precision machining ( precision measurement)
Machining and measuring to exacting standards. Four basic considerations are: dimensions, or geometrical characteristics such as lengths, angles and diameters of which the sizes are numerically specified; limits, or the maximum and minimum sizes permissible for a specified dimension; tolerances, or the total permissible variations in size; and allowances, or the prescribed differences in dimensions between mating parts.
- shank
shank
Main body of a tool; the portion of a drill or similar end-held tool that fits into a collet, chuck or similar mounting device.
- tolerance
tolerance
Minimum and maximum amount a workpiece dimension is allowed to vary from a set standard and still be acceptable.