

Practicing routine grinding machine maintenance produces productivity gains
Because of the array of precision functions grinding machines perform, it's vital to properly maintain them to keep them operating at their peak in terms of accuracy and reliability. You can start by devising a maintenance program and sticking with it. This article provides tips on how to set up key parts of that program.
Because of the array of precision functions grinding machines perform, it’s vital to properly maintain them to keep them operating at their peak in terms of accuracy and reliability. You can start by devising a maintenance program and sticking with it. This article provides tips on how to set up key parts of that program. The tips apply to virtually all types of grinders, including surface, OD, ID and rotary ones.
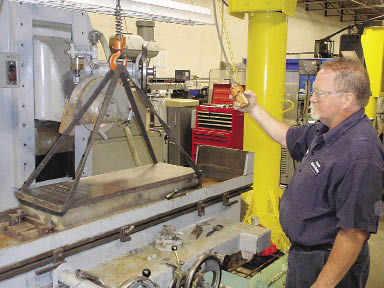
A mechanic removes the magnet from a surface grinder for cleaning. Keeping scale and corrosion from accumulating between the bottom of the magnet and the grinder’s subtable is a must to help ensure accurate grinding. All images courtesy of Pyramid Rebuild & Machine.
While metalcutting professionals understand that grinders must be properly maintained, that doesn’t mean it gets done. Frequently, production demands elbow out maintenance chores and before long, the results of neglecting machine care become painfully evident. Inaccurate parts, breakdowns and even safety hazards can result. To avoid potential injuries, costly remedial action and lost production time, shop managers must first identify the maintenance requirements for each grinding machine and use that information to craft a comprehensive maintenance program.
A maintenance program should include a method of determining when each maintenance task was performed and by whom to help ensure accountability.
Clean the Machine
Keeping a grinder clean is a no-brainer, right? Yet it’s not uncommon to walk into a shop with hundreds of thousands of dollars of precision grinding equipment and see a grimy mess on every machine. A chief reason for this is the grinding process itself. Grinding produces swarf, a mixture of minute metal particles and abrasive material that quickly works its way into a grinder’s clearance areas and crevices. The problem is particularly common on rotary and centerless grinders because of the large volume of material they are able to remove, and it can cause serious damage if left unchecked. Therefore, it’s vital that a procedure for cleaning grinders is developed and followed.
It’s not enough just to wipe off exposed surfaces on a machine. A cleaning plan must identify the hidden areas where swarf tends to collect and describe how to clean those sections. Water guards, way covers and clearance areas between slides are areas where swarf tends to collect and cause problems. In some cases, the only option is to remove the component for cleaning. Use a scraper or wire brush to remove heavy debris and hot water for lighter debris, such as coolant residue.
Keep an eye on coolant. Over time, coolant becomes contaminated and can develop corrosive characteristics that eat machine components. Contaminated coolant can damage everything from machine guards to way surfaces to lubrication lines. Periodic cleaning of the coolant storage tank and filtration systems is a must.
The coolant mixture itself should be adjusted according to the manufacturer’s recommendations to ensure the coolant is still doing its job. If OEM specifications are unavailable, consult a coolant manufacturer.
Monitor Lubrication
Grinders can require costly repairs if their lubrication systems fail or do not operate at 100 percent efficiency. Way lube systems on grinders are typically a terminal design, which means they consume oil. If operators don’t have to add oil to the way lube system on a regular basis, then it is probably not working properly. To keep terminal lube systems operating properly, lubricant levels must be rigorously maintained.
It’s also critical to use the correct lubricant. Don’t assume the right lubricant is what you’ve always used. Review the OEM specifications or ask a lubricant supplier.
In addition, clean the lube reservoirs and change the filters at least every 6 months. Visually inspect the way surfaces at 6-month intervals to make sure lubricant is being delivered properly. The ways should be clean except for a thin film of lubricant. Dry ways indicate a lube system malfunction that must be addressed immediately.
During the visual inspection, note the way wipers. These wipers are not present on all grinders, but when they are they must be kept in first-rate condition because wipers remove dirt and contamination from the way surface. Adjust any wipers that are not fully engaged on the way surface and replace those that show signs of deterioration. It’s best to err on the side of caution in this regard. When in doubt about the condition of a wiper, replace it.
Another key task is examining the lubrication system’s lines. It is common for swarf buildup and the corrosive action of rancid coolant to damage grinder lube lines. Replacing damaged or broken lines is critical because most grinders have a “parallel” type of lube system. On these systems, the lubricant follows the path of least resistance, so a single broken line can defeat the entire system. That results in some surfaces receiving too much oil and others not receiving any. If left unchecked, premature wear of the way surfaces will result.
Beware Gummy Gibs
At least once every 6 months, remove and clean the gibs on a grinder’s vertical slide. Usually, common hand tools are all that’s required to remove the gibs. Once removed, clean them by scraping off heavy contamination and then remove any remaining contaminants with hot water followed by thorough drying and applying a light coating of way oil. Though somewhat time-consuming, this task is necessary because coolant mist dries on the gibs, making them prone to sticking. Gummy gibs strain the vertical slide leadscrew and accelerate wear on this costly precision component. Worn lead screws can reduce accuracy and must either be replaced or rebuilt. In addition to being costly, the process is likely to sideline a grinder for weeks.
Review the print ads from this magazine to continue
This quick advertiser review unlocks the rest of the article and keeps the full-screen reader focused on the ads instead of the page chrome.
Advertisers included in this article experience
Print placements connected to this article
Darex
Advertorial
superabrasive tools. Mastertech tool sharpener. Darex offers a fasteners & sockets. MSC Diamond Products Co. manufactures a new chuck attachment for the XT-3000 Industrial Direct Co. Inc. offers 700 variety of PCD, PCBN, CVD diamond and Xpandable tool sharpener. The chuck new products, such as socket products, monocrystalline diamond inserts and accurately grips common shank diameter 18-8 and 316 stainless steel fast.
Advertorial superabrasive tools. Mastertech tool sharpener. Darex offers a fasteners & sockets. MSC Diamond Products Co. manufactures a new chuck attachment for the XT-3000 Industrial Direct Co. Inc. offers 700 variety of PCD, PCBN, CVD diamond and Xpandable tool sharpener. The chuck new products, such as socket products, monocrystalline diamond inserts and accurately grips common shank diameter 18-8 and 316 stainless steel fasteners, cutting tools, as well as PCD diamond and Morse taper drills. The chuck can material handling bins and drawers inserts with laser-etched chipbreakers. sharpen drills with diameters from 3mm used to house fasteners. Other products Tools include PCD drills in solid-edge and to 12mm. Telephone: (800) 547-0222. include corrosion-resistant and nylon helical-flute styles; PCD and PCBN drills, Darex products and tamper-resistant fasteners. mills, reamers and count
Visit Darex View this placement in the issue recordPrint ads from this magazine
superabrasive tools. Mastertech tool sharpener. Darex offers a fasteners & sockets. MSC Diamond Products Co. manufactures a new chuck attachment for the XT-3000 Industrial Direct Co. Inc. offers 700 variety of PCD, PCBN, CVD diamond and Xpandable tool sharpener. The chuck new products, such as socket products, monocrystalline diamond inserts and accurately grips common shank diameter 18-8 and 316 stainless steel fast.
Advertorial superabrasive tools. Mastertech tool sharpener. Darex offers a fasteners & sockets. MSC Diamond Products Co. manufactures a new chuck attachment for the XT-3000 Industrial Direct Co. Inc. offers 700 variety of PCD, PCBN, CVD diamond and Xpandable tool sharpener. The chuck new products, such as socket products, monocrystalline diamond inserts and accurately grips common shank diameter 18-8 and 316 stainless steel fasteners, cutting tools, as well as PCD diamond and Morse taper drills. The chuck can material handling bins and drawers inserts with laser-etched chipbreakers. sharpen drills with diameters from 3mm used to house fasteners. Other products Tools include PCD drills in solid-edge and to 12mm. Telephone: (800) 547-0222. include corrosion-resistant and nylon helical-flute styles; PCD and PCBN drills, Darex products and tamper-resistant fasteners. mills, reamers and count
Continue reading
July 2009
Carefully and accurately mark each gib before removal so it can be reinstalled to precisely the same depth—a critical adjustment. If maintenance personnel are not familiar with the gib-setting procedure, call a reputable professional. As a gib is removed, make sure the working side of the gib is covered with a thin film of lubricant. If it isn’t, track the source of the lube system problem, such as a faulty lube pump or broken lube line, and replace the component.
Once the gib and way surfaces are clean, reinstall the gib, setting it to the gib’s precise location prior to removal. A gib that is set too tight causes vertical “stick-slip” on a downward move. Stick-slip on a grinder slide can produce grinding errors and be hazardous. A gib that is too loose reduces accuracy and rigidity. Gib adjustment is tricky, so it’s probably prudent to seek the aid of a professional for this task.
Maintain the Magnet
Maintaining the magnet is a must for surface grinders. About every 6 months, depending on usage, remove the magnet and clean it and the table beneath it. After removing all the grime and scale, stone the bottom of the magnet and then lightly oil that surface and the table before reinstalling the magnet. Apply a light film of the machine’s way oil, which won’t contaminate the grinder’s coolant.
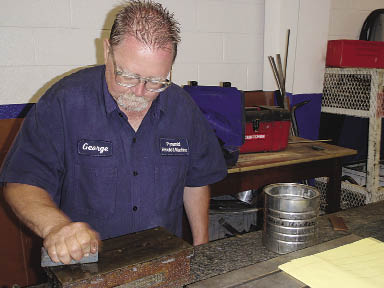
Stoning a surface grinder magnet is an effective way to remove the final bits of corrosion and to flatten it before reinstalling it on the grinder.
Lack of magnet maintenance will produce a scale and corrosion buildup between the bottom of the magnet and the table. If left unchecked, this scale can accumulate to a thickness of about 1⁄16 ” and distort the surface grinder table to the extent that it no longer rides true in the ways. If scale buildup is permitted to remain, the way surfaces of the bed and table wear because of point loading caused by the table distortion. If this occurs, then the only remedy is to rescrape the ways to restore the grinder’s accuracy, a process that can sideline the grinder for 2 or 3 weeks. The amount of time depends on the complexity of the grinder and degree of wear. One week may be sufficient for a small surface grinder with minimal wear, whereas it may take a week to dismantle a large rotary grinder prior to beginning the realignment work.
Magnet maintenance on cylindrical grinders involves removing the swivel table, or subtable, and performing the same table maintenance as recommended for the surface grinder. A 6-month maintenance interval is also appropriate for this task.
Inspect Clamping Gear
On rotary grinders, the stone segment clamps and clamp screws can become bent, worn or damaged. Examine these components daily for these problems and replace them as necessary. Also, inspect the tapped holes in the wheel. If any threads are stripped, repair them or replace the wheel. Failure to maintain the wheel can result in stones being dropped, which will cause serious damage that’s expensive to repair.
Wheel components should also be cleaned every 6 months. Remove the grinding wheel on surface grinders and thoroughly clean the wheel adapter, the spindle and the threaded pieces. Scrub inside the wheel guard as well. Use scrapers to remove heavy contamination, followed by rinsing with hot water to penetrate residual coolant film. Thoroughly dry the components before reassembly. This procedure keeps corrosion in check on these components. Use an antiseize compound during reassembly. Also, replace the wheel blotters and balance the wheel before putting the grinding machine back in service.
Inspect Covers and Guards
Continually scrutinize way covers and water guards on grinders. They perform a vital function: protecting the operator and preventing grinding swarf from straying onto the slideways and other critical components.
Guards take a beating. As previously noted, they can be continuously exposed to the corrosive action of poorly maintained coolants and physically damaged by swarf accumulation. Preserving them demands frequent, thorough cleaning using the tools and techniques previously described to remove swarf and to clear corrosive coolants. When cleaning the guards, inspect them for any damage. If any is spotted, repair or replace them as soon as possible.
Rigorously adhering to these maintenance procedures and performing the care requirements recommended by a grinder’s manufacturer should dramatically reduce production interruptions caused by breakdowns. These actions should also boost parts accuracy and reduce the cost of repair work. Keeping grinding machines properly maintained isn’t difficult, but the hard part is making sure maintenance and routine repairs are undertaken in a timely, thorough fashion. The choice is yours: either do it or pay the consequences. CTE
About the Author: Jim Leigh is co-owner of Pyramid Rebuild & Machine LLC, Tallmadge, Ohio. Pyramid specializes in rebuilding, retrofitting and remanufacturing machine tools. For more information about the company’s services, call (330) 633-4452, visit www.pyramidrebuilders.com or enter IS #360.
Glossary terms in this article
Related



Subscribers can use MFGAxis notes, saves and discussion tools with their innoNET account.