Creep-Feed Exam
Creep-Feed Exam
Researchers at the Center for Grinding Research performed a series of grinding wheel is slowly fed into the workpiece at sufficient depth of cut to accomplish in one pass what otherwise would require repeated passes. S…" title="Grinding operation in which the grinding wheel is slowly fed into the workpiece at sufficient depth of cut to accomplish in one pass what otherwise would require repeated passes. S…" aria-label="Glossary: creep-feed grinding">creep-feed grinding tests to determine the causes of the heat damage and striations they observed. The tests involved grinding slots and vertical faces. This report discusses the dynamics behind these problems and suggests ways to avoid them.
Heat damage and striations commonly mar the surface of slots and vertical faces that have been machined with grinding wheel is slowly fed into the workpiece at sufficient depth of cut to accomplish in one pass what otherwise would require repeated passes. S…" title="Grinding operation in which the grinding wheel is slowly fed into the workpiece at sufficient depth of cut to accomplish in one pass what otherwise would require repeated passes. S…" aria-label="Glossary: creep-feed grinding">creep-feed grinding techniques. This series of studies seeks the root causes of these ills.
Manufacturers who work with difficult-to-machine materials appreciate creep-feed (CF) grinding. It's one of the few operations that can cut high-temperature alloys with speed and accuracy. But these users' appreciation wanes when they must CF grind features such as slots or vertical faces (which can be considered one-sided slots) into their parts. After such an operation, manufacturers frequently find their wheels eroded by excessive wear, their workpieces burned, and their ground surfaces marred by striations.
The burned parts are probably caused by the worn wheels. Earlier studies have already established a link between wheel wear and thermal damage. But the question still remains: Why do wheels wear faster when they are used to CF grind slots? To answer this question, researchers at the Center for Grinding Research and Development at the University of Connecticut, Storrs, conducted a series of studies. During these tests, the researchers looked at a variety of factors, including dressing and wheel-preparation techniques, wheel speed, and coolant delivery, and noted their effects on the wheel and the part surface. Because CF grinding is often used to cut difficult-to-machine materials, the researchers used exotic alloys as their test specimens. They also tested hardened steel.
Dressing and Coolant
For one of the studies, researchers varied the dresser feed rate and the delivery of coolant as they ground four aerospace components. The results of these tests are shown in Table 1. For the first operation in Table 1, a spoiler/shroud top was ground. This part had a predominantly flat profile with only minor vertical faces. Operation 2 was a seal-tip grind, with a part profile that was almost entirely a vertical face. Operation 3 was a channel grind, with the wheel cutting a wide groove. Operation 4 was a straddle grind, in which two wheels with a gap between them simultaneously ground vertical faces on two sides of a part. The spoiler/shroud top in Operation 1 was made of MAR-M-247; the rest of the parts were made of Inconel 713C.
| Trial No. | Dresser | Right | Right | Right | Qualitative |
| Operation 1 - Spoiler/Shroud Top | |||||
| 1 | Baseline | 72 | 827 | NH-P | Fair-Poor |
| 2 | +32.3 | 72 | 827 | NH-P | Fair |
| 3 | +61.8 | 72 | 827 | NH-P | Fair-Good |
| 4 | +150.0 | 72 | 827 | NH-P | Good |
| 5 | Baseline | 72 | 827 | NH-P | Poor |
| 6 | Baseline | 72 | 827 | NH-P | Poor |
| 7 | Baseline | 159 | 724 | NH-S | Fair-Poor |
| 8 | Baseline | 159 | 724 | NH-S | Fair |
| 9 | Baseline | 159 | 724 | NH-S | Fair-Poor |
| 10 | Baseline | 159 | 724 | NH-S | Fair |
| 11 | -26.5 | 341 | 248 | 19.0 mm D | Very-Good |
| 12 | -26.5 | 303 | 200 | 19.0 mm D | Good |
| 13 | -26.5 | 303 | 200 | 19.0 mm D | Good |
| 14 | -26.5 | 303 | 200 | 19.0 mm D | Good |
| 15 | -26.5 | 303 | 200 | 19.0 mm D | Good |
| Operation 2 - Seal Tips | |||||
| 1 | Baseline | 102 | 772 | NH-P | Good |
| 2 | -37.5 | 102 | 772 | NH-P | Good |
| 3 | -50.0 | 102 | 772 | NH-P | Fair |
| 4 | Baseline | 303 | 200 | 19.0 mm D | Good |
| 5 | -25.0 | 303 | 200 | 19.0 mm D | Good |
| 6 | -50.0 | 303 | 200 | 19.0 mm D | Fair |
| 7 | -62.5 | 303 | 200 | 19.0 mm D | Fair |
| Operation 3 - Channel | |||||
| 1 | Baseline | 303 | 200 | 19.0 mm D | Good |
| 2 | Baseline | 303 | 200 | 19.0 mm D | Good |
| 3 | Baseline | 303 | 200 | 19.0 mm D | Good |
| 4 | Baseline | 303 | 200 | 19.0 mm D | Fair Good |
| 5 | -25.0 | 303 | 200 | 19.0 mm D | Fair-Good |
| 6 | -25.0 | 303 | 200 | 19.0 mm D | Fair |
| Operation 4 - Straddle | |||||
| 1 | Baseline | 140 | 662 | NH-P | Fair |
| 2 | Baseline | 140 | 662 | NH-P | Fair-Poor |
| 3 | Baseline | 140 | 662 | NH-P | Fair-Poor |
| 4 | Baseline | 140 | 662 | NH-P | Fair-Poor |
| 5 | Baseline | 318 | 662 | 12.7 mm D | Good |
| 6 | Baseline | 318 | 662 | 12.7 mm D | Fair-Good |
| 7 | Baseline | 318 | 662 | 12.7 mm D | Fair-Good |
Table 1: The results of grinding tests performed on four different aerospace components.
With each trial, the researchers looked at how much of the wheel was consumed, as indicated by the rate at which the dresser was fed into the wheel during continuous dressing, and they looked at how severely the part was burned. Between trials they varied the coolant delivery to see how the changes would affect the relationship between the dresser feed rate and the point at which the part burned.
In Table 1, the dresser feed rate is given as a percentage above or below a baseline rate. The designations NH-P or NH-S in the "Right Nozzle Type" column represent trials using nonoptimized production coolant nozzles. The 19.0mm D and 12.7mm D designations in the column indicate the use of optimized circular nozzles designed by the grinding center to improve coolant delivery into the grinding zone.
As the results of Operation 1 show, optimizing coolant delivery can significantly improve wheel usage when a predominantly flat profile is ground. Wheel consumption could be reduced by more than one-fourth without burning the part when an optimized coolant system was used during the tests. However, when a slot or vertical face was ground, optimizing coolant delivery did not produce predictable results. When coolant delivery was optimized in Operation 2, for example, the dresser feed rate could be reduced significantly without burning the part. But the significant improvements seen in the grinding of thin-walled seal tips were not repeated in Operations 3 and 4. The contrast between the results in Operation 1 and Operations 3 and 4 are even more striking when the differences in workpiece material are considered. In Operation 1, MAR-M-247, a difficult-to-grind material, was ground, while a somewhat easier-to-grind Inconel 713C was ground in the other operations.
These tests showed that the problem of workpiece burn during the grinding of slots and vertical faces can't always be corrected with modifications to the coolant-delivery system alone. To devise a more universal solution, the researchers found they first needed a better understanding of the wheel-wear mechanisms at work during the grinding of these difficult profiles.
Investigating Grinding Forces
In the next series of tests, the researchers investigated the origin and nature of the grinding forces that cause wheels to wear during the sideface grinding of MAR-M-247. The tests were conducted on a Blohm Profimat 412 CF grinding machine. Vertical, horizontal, and cross-force measurements were taken with a dynamometer as the wheel skimmed the side of the workpiece with a depth of cut (DOC) of 19.00mm and a width of cut (WOC) of 1.27mm. Table speed ranged from 25mm/min. to 508mm/min. Wheel speed was 30m/sec. For most of the trial runs, the continuous dressing rate using a diamond roll dresser was 2µm/rev. Figure 1 shows the grinding setup used throughout these tests.
Two types of wheel geometries were tested to determine if grinding forces were originating on the sidewall of the wheel. The wheel used for the first six test runs had a plain-form geometry with a flat profile on the wheel's outer diameter (OD) and sidewall. Typical settings of 254mm/min. table speed and 1µm/rev. continuous dressing rate were chosen because they are common settings for this type of operation. For the last five runs, researchers recessed the sidewall of the wheel radially out to a radius of 5.08mm less than the wheel radius, as shown in Figure 2. With continuous dressing, the height of the sidewall decreased during each run. All other settings remained the same.
During the first six runs, the peak force on the sidewall remained essentially constant. Although a blackening of the wheel sidewall was observed at the beginning of these runs, the measurements indicated no increase in sidewall force.
The peak forces remained essentially constant at this level during the five runs with the recessed wheel as well. The last run proved to be the only exception. During the first four runs with the recessed wheel, continuous dressing reduced the wheel OD and brought the dresser ever closer to the recessed part of the wheel. By the fifth run, the OD was so small that the wheel corner fractured. The researchers also noted that the surface of the sideface ground with the recessed wheel was slightly rougher than the surface ground with the plain-form wheel.
Seeking a Solution to Striations
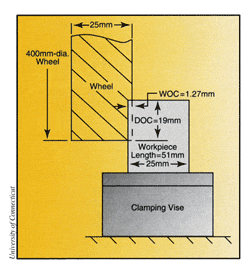 | Figure 1: This setup was used to analyze the forces generated during the CF dringing of a workpiece sideface. |
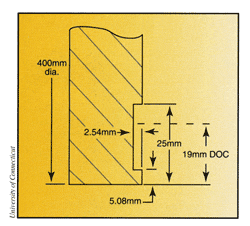 | Figure 2: A recess was ground into the test wheel to assess the forces on the wheel sidewall. |
While grinding sidefaces using the parameters and conditions specified above, the researchers observed a peculiar striation pattern appearing on the workpiece sideface after one pass with the grinding wheel. Users have reported similar marks on their workpieces when they have tried to CF grind slots or vertical faces. After a preliminary investigation of these striations, the researchers suspected that vibrations in the workpiece or the wheel caused the marks. But accelerometer tests revealed no vibrations of the frequency that would cause the intermittent pattern of striations observed.
A second theory suggested that the striations were caused by wheel deflections. The researchers thought the wheel was deflecting because no equalizing force was present on the opposing side of the wheel to counteract the forces present during grinding. Without these counteracting forces, the wheel and spindle together were acting as a cantilever. To test this theory, the researchers placed workpieces on both sides of the wheel and ground two sidefaces simultaneously, effectively reducing the transverse force to 0. This did not eliminate the striations, however. In fact, the marks were present on both sidefaces.
A clue to the true cause of these striations was found when the researchers examined workpieces ground at a table speed of 127mm/min. They discovered an irregularity in the fillet radius where the sidewall met the horizontal face of the workpiece. At the leading edge of the workpiece, this radius was always larger than the radius of the as-dressed wheel. But along the length of the corner, the radius became sharper. At the workpiece's trailing edge, the corner profile was very close to the as-dressed profile of the wheel.
The researchers theorized that the change in radius was a reflection of how the wheel wore during the grind. With continuous dressing and the wheel grinding in the downcut mode, maximum wheel wear was occurring just as the wheel broke through the back edge of the workpiece. This wearing process is related to the wheel's maximum normal infeed rate (MNIR). This rate is defined as the normal infeed at the top of the grinding arc, where the relative magnitude and direction of wheel and workpiece velocities create the highest relative infeed velocity. During the grind, the MNIR increases, reaching its highest point at the wheel's full DOC. The MNIR then remains constant until the wheel breaks through the back edge of the workpiece, at which point it begins to decrease.
Research has shown that wheel wear follows the progress of the MNIR, and the wear rate also reaches its highest rate at the wheel's full DOC. The wear rate may become so high that continuous dressing cannot keep the corner of the wheel sharp. That's why the corner fillet radius on the examined workpiece was largest on the workpiece's leading edge. When this surface was created, the wheel was at its highest MNIR and wheel wear was at a maximum.
Immediately after this point during the test grind, the wheel broke through the back edge of the workpiece. As the wheel's wear rate decreased, continuous dressing was gradually able to overcome the effects of the wear. The corner fillet radius became sharper, eventually returning to its original state.
According to the researchers' hypothesis, it was this corner wear that led to the striations that were observed on the sideface. This wear occurred intermittently as the corner broke up during the grind. Each time a piece of the corner broke off, another mark was made on the sideface.
Having postulated this theory, the researchers then began looking for evidence that corner wear was, in fact, the cause of the striations. They reasoned that if corner wear was the mechanism, they should be able to eliminate the marks by reducing the feed rate, because lowering the feed rate would reduce the rate of wear. With the feed rate reduced sufficiently, the wear rate would be low enough to allow the dresser to keep the corner sharp and prevent the type of damage that led to the striations.
To test this theory, a workpiece was ground at speeds of 127mm/min., 102mm/min., 76mm/min., 51mm/min., and 25mm/min. The researchers examined the workpiece sideface after each grind. They found striation marks at each table speed except 25mm/min. At that speed the grinding produced only extremely light streaks on the sideface.
Next, several workpieces were ground at both 25mm/min. and 12mm/min. to confirm that wheel wear was the cause of the fillet-radius change on the workpiece. In these tests, both continuous dressing and dressing of the wheel sidewall were employed. The researchers stopped each test in the middle of the grind to take a coupon. To perform this procedure, the researchers used the wheel to grind a profile in a soft steel sample. This profile provided an image of the wheel's shape at the time the coupon was taken. Coupons of the wheel profile also were taken after each full grind.
After a full grind at a table speed of 127mm/min., the wheel's corner radius measured 0.13mm, which is roughly equal to the measurement the researchers took of a fully dressed wheel's corner radius. This finding indicates that no evidence of wheel-corner wear remains by the end of the grind. However, when the grind was stopped at the point of maximum wheel wear, the corner radius was 0.89mm, seven times the radius of the as-dressed corner. This proves that significant wear does occur during the grind. When this same grinding pass was continued, the corner radius returned to 0.13mm by the end of the full grind.
Researchers then measured how much of the wheel's radius was removed by continuous dressing during one grinding pass. They found that the material-removal rate (mrr) was not sufficient to remove the corner radius during the middle of the grind. Furthermore, they found that the total amount of material removed from the wheel's radius during a single grinding pass ranged from 0.51mm to 1.27mm. This finding shows that it is likely that continuous dressing has removed the worn corner of the wheel by the end of the grind.
At the point of maximum wear for a grind with a table speed of 25mm/min., the low table speed has kept the wheel-corner wear rate low enough to allow continuous dressing to maintain corner sharpness throughout the grind. The corner profile at this point is equal to the as-dressed radius of 0.13mm, indicating that no measurable wheel-corner breakdown occurred during the grind.
These tests show a correlation between wheel-corner breakdown and the presence of striation marks on the workpiece sideface. This evidence led researchers to the conclusion that wheel-corner breakdown, as it follows the progress of the wheel's MNIR, was primarily responsible for the striation marks observed throughout the sideface grinding tests.
Eliminating Light Streaks
There was still one other possible cause of striations, however. The researchers realized that some of the marks on the workpiece's vertical face, such as the light streaks observed on the workpiece ground at 25mm/min., could have been caused by the surface condition of the wheel's sidewall, because the sidewall had not been dressed prior to the operation. To test this possibility, the sidewall of the grinding wheel was dressed with a diamond-nib dressing tool, and the tests at a table speed of 25mm/min. were repeated. The light streaks were completely gone after this grind; however, the sideface of the workpiece was burned and mottled.
To find a cause for this burning, the researchers carefully examined the alumina wheel. They discovered that the sidewall grain was more closed after dressing than the grain of the as-manufactured wheel, and they concluded that it was this closure that caused the burn on the part. Since it was not possible to duplicate the coarser sidewall surface of the as-manufactured wheel, the researchers repeated the tests with the coolant nozzles in various positions until the burn was eliminated. Throughout these tests, the sideface scratches did not reappear.
The researchers concluded that sidewall dressing can improve a sidewall's ability to impart a good surface finish, and that the procedure should be performed before slots or vertical faces are ground. Furthermore, these tests emphasized the importance of accurate nozzle positioning in preventing workpiece burn.
Examining CBN Wear
The researchers also ground vertical faces with resin-bond cubic-boron-nitride (CBN) wheels to see if the superabrasive wheels are subject to the same wear mechanisms that affect an alumina wheel's performance. For the CBN-wheel tests, M-2 steel was ground. The test grinds' DOC was 6.35mm. The WOC ranged from 0.127mm to 0.508mm. Table speed ranged from 25mm/min. to 508mm/min. Wheel speed was 45m/sec. Continuous dressing was not tested because the procedure is not used with CBN wheels.
The test runs with the CBN wheel produced striations that were similar to the pattern produced by the alumina wheels. In addition, the researchers found that the operation left a horizontal line along the length of the workpiece about halfway up the sideface. The position of the line appears to coincide with the height at which the wheel's corner fillet meets the vertical face of the workpiece. Top-to-bottom traces of the 6.35mm-high sidefaces were made at five locations equally spaced along the full length of the sideface. Each trace shows a distinct change in direction, or taper, at about the halfway point.
The taper in the workpiece sideface seems to correspond to a taper found in the wheel's sidewall. On-machine measurements of the sidewall were taken in four locations. These measurements trace the wheel's surface from the wheel corner to the inner diameter (ID) of the abrasive layer. The traces reveal a taper on the wheel that approximately coincides in position with the middle of the workpiece sideface. The traces also show the coarseness of the wheel sidewall (about 37.5µm), which was not trued before the grinding tests.
To get rid of the marks left by the CBN wheel, the researchers took the same measures they took with the alumina wheels. They trued the CBN wheel's sidewall and ground the workpiece at the slow table speed of 25mm/min. These measures eliminated the striation marks and the horizontal line almost completely after one grinding pass.
The marks came back on subsequent passes, however, and the researchers could not determine why the marks returned so quickly. Thus far, the evidence suggests that the marks are linked to a breakdown of the wheel-corner radius. Immediately after the wheel was trued, the radius was about 0.10mm, but during grinding it broke down to a radius approximately equal to the operation's WOC. On a sidewall grind with a WOC of 0.13mm, the wheel broke down to a radius of about 0.18mm in just two passes. During an operation with a WOC of 0.51mm, the wheel broke down to a radius of about 0.51mm after 20 passes. The researchers are currently conducting further studies to better understand the progress of CBN wheel wear and its effects on the surface finish of the workpiece's sideface.
Staying Sharp
In a third study, the researchers examined the effect of vertical face grinding on the corner sharpness of an alumina wheel. Sharpness, for this study, was defined as the slope of the mrr vs. a plot of the grinding force. This slope is better known as the work removal parameter (WRP) and is usually determined for particular wheel/workpiece combinations.
As part of this study, wheel sharpness curves were developed for a Tyrolit alumina wheel with a dressed OD. The wheel was used to grind a vertical face on M-2 tool steel. The operation was performed with a coolant nozzle at each end of the workpiece and a continuous dressing rate of 0.125µm/rev.
As the grinding progressed, the wheel sidewall became discolored and plugged with workpiece swarf, and it dulled. In addition, severe burn developed on the sideface of the workpiece throughout the tests. The cause of this burn can be seen in Figure 3. The slopes that indicate the sidewall's WRP in Figure 3 are nearly equal, which means the sidewall maintained a relatively constant sharpness during the three grinding runs represented. But the shifting position of the slopes shows an increase in the transverse threshold force with each run. This increase is the result of using the wheel without cleaning or redressing the sidewall between sets of grinding runs. The rising threshold force indicates that the wheel is rubbing rather than cutting, and this is the likely cause for the increase in sideface burn.
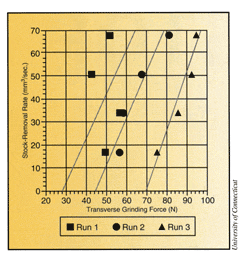 | Figure 3: The three slopes indicate an increasing transverse threshold force from run to run leading to workpiece burn. |
A second series of similar tests was conducted with changes in the delivery of coolant. One additional nozzle directed a stream perpendicular to the wheel sidewall in the direction of the wheel/workpiece vertical interface. Also, a 500-psi jet of coolant was used to clean the sidewall during the operation. Such a jet is typically used to clean the OD of CBN wheels. Grinding was once again performed without redressing the wheel sidewall between runs.
In the second series of tests, the change in transverse threshold force was reduced but not eliminated. The workpiece sideface still exhibited burns, but the burning was less severe than it was during the first series of tests. The continued presence of workpiece burn suggested that the grits themselves were wearing on the wheel sidewall during successive vertical face grinds. To see if they could eliminate the effects of this wear, the researchers conducted a third series of tests. The same coolant-delivery setup used for the second series of tests was used for this series. In addition, the researchers dressed away the worn abrasive grits between sets of grinding runs. With dressing, no burn was observed, and the transverse threshold force and WRP remained nearly constant, indicating a consistent wheel sharpness on the wheel sidewall. These results are shown in Figure 4.
It is reasonable to conclude from these wheel-sharpness tests that swarf embedded in the wheel sidewall and worn grits increased the grinding force and caused the burn on the workpiece sideface. To eliminate the burn, eliminate its root causes - by cleaning the wheel corner and sidewall during grinding, applying generous amounts of coolant in the grinding zone (especially between the wheel sidewall and workpiece sideface), and dressing away the worn grits.
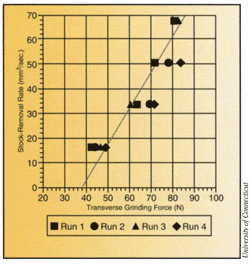 | Figure 4: A change in coolant delivery and redressing the wheel sidewall between runs helped eliminate the rise in threshold force and workpiece burn. |
Recommendations
The following recommendations and observations were developed as a result of these studies:
| | Workpiece burn and thermal damage are common problems when grinding vertical profiles. Shops that perform this type of operation must be prepared for higher wheel usage, because the measures that will be necessary to keep the grinding-wheel corners and sidewall clean and sharp will increase wheel consumption. |
| | Recessing the sidewall of a grinding wheel will improve cooling efficiency slightly. These studies also indicate, however, that a recess on the wheel sidewall will decrease surface-finish quality, even though the wheel sidewall does not contribute measurably to the grinding forces. |
| | Shops that employ continuous dressing while CF grinding should realize that the wheel corner may be wearing significantly even though the wheel may show no signs of this wear after the operation is completed. The wear may be hidden by the effect of continuous dressing, which tends to restore the corner profile as the wheel breaks through the trailing edge of the workpiece. |
| | Shops can improve the surface finish produced when grinding a vertical face by dressing the wheel sidewall first. However, dressing may still allow burn on the workpiece sideface, because the grains of a dressed sidewall may be more closed than they are on an as-manufactured wheel. |
| | Burning can be reduced when grinding vertical faces by dressing the wheel sideface to remove worn grits, cleaning the wheel corner and sidewall during operation, and generously applying coolant in the grinding zone, especially at the wheel/workpiece sidewall interface. |
Many of these recommendations also may be applicable to the use of resin-bond CBN wheels to CF grind slots and faces. But more study is needed to confirm that the same wear mechanisms are at work.
About the Authors
Trevor Howes is director of the Center for Grinding Research and Development at the University of Connecticut, Storrs. Richard Mindek Jr. is a graduate student at the university.


