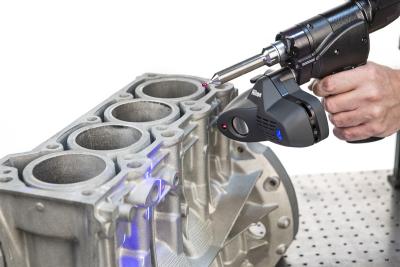
22 years since the inception of the ModelMaker product line, the cutting-edge ModelMaker H120 firmly pushes the ever-exacting boundaries of hand-held laser scanning, Nikon Metrology says. Incorporating blue laser technology, ultrafast frame rate, specially developed Nikon optics and the ability to measure the most challenging materials, this represents the next generation of portable laser scanning.
With a field-of-view width up to 120 mm and a point resolution of up to 35 μm, the ModelMaker H120 is suitable for users requiring fast data collection over a large area but cannot afford to compromise on detail.
An extremely fast frame rate of over 450Hz is available even when measuring difficult materials such as carbon fiber, gloss black, reflective or significantly multicoloured parts. The ModelMaker H120’s speed is independent of its ability to capture high-quality data on the most challenging parts. With 2,000 points per scan line and no reliance on point-to-point interpolation to artificially boost data density, it is possible to measure small details on large surfaces even when cycle time is critical.
To complement such high productivity, the ModelMaker H120 uses advanced Nikon optics and a blue, low speckle, laser to give very high accuracy and low noise data. This means it is now possible to clearly identify small scratches and abrasions on a surface. As well as the shape of the surface, sharp edges are represented like never before. The product offers a scanner accuracy of 7 μm (1 sigma) and combined system accuracy with the MCAx arms of up to 28 μm (2 sigma).
The fourth generation of Enhanced Sensor Performance (ESP4) dynamically adapts the laser parameters not just for every scan line, but for every point in each scan line, enabling parts with significant color changes or reflectivity to be measured from any angle. This fast-tracks the user’s confidence with the system and minimises training needs since a single scanner setting is capable of measuring almost all parts encountered in industrial metrology applications.
Temperature compensation and robust thermal stability mean warm-up time to achieve a stable setup is unnecessary. Simply connect to the PC using a USB cable, power on and start scanning within a few seconds. Real-time feedback is provided by display of the boundaries of the measurement area on the measured part which ensures the user is always scanning at the optimal position. An integrated locking mechanism provides a simple, user-friendly and repeatable connection to the MCAx arm. This allows the scanner to be used on MCAx arms of different sizes and specifications located throughout a facility rather than needing to move the whole arm assembly.
By combining the ModelMaker H120 scanner with the high-performance MCAx arm, the combination of noncontact scanning and contact probe measurement allows users freedom to measure almost anything. This includes freeform and geometric parts, hard-to-reach features, highly textured or transparent materials and even materials which deform easily such as foams or textiles. In many cases of industrial feature measurement, the accuracy performance and low noise level of the new scanner reportedly exceeds the performance of tactile probes.
With hand-held laser scanning, users can rapidly and easily understand the dimensional quality of their company’s products both inside the metrology lab or on the shop floor. By combining the portability, accuracy and application flexibility of the MCAx arm with the extreme performance capabilities of the ModelMaker H120, users can achieve precise measurements with confidence in a multitude of situations.
Through direct integration with a variety of class-leading software tools for scanning, probing, processing and dimensional analysis of measurement data – users can tailor the solution for their needs. From advanced inspection using geometric dimensioning and tolerancing (GD&T) with color map comparisons to nominal CAD, fly-outs and sectional cut-through to reverse engineering or even simply using high-definition scan data to generate polygon meshes for additive manufacturing.
Contact Details
Related Glossary Terms
- computer-aided design ( CAD)
computer-aided design ( CAD)
Product-design functions performed with the help of computers and special software.
- interpolation
interpolation
Process of generating a sufficient number of positioning commands for the servomotors driving the machine tool so the path of the tool closely approximates the ideal path. See CNC, computer numerical control; NC, numerical control.
- metrology
metrology
Science of measurement; the principles on which precision machining, quality control and inspection are based. See precision machining, measurement.
