Camshaft grinding: Advanced technological innovation through collaboration
Camshaft grinding: Advanced technological innovation through collaboration
The first automobile internal-combustion engines used a camshaft to open and close poppet valves. Now, more than 100 years later, camshafts are still used and their basic function hasn't changed—even though camshaft geometries, materials, surface finishes and tolerances have improved greatly to achieve better fuel economy, lower emissions and larger torque.

Editor's Note: This whitepaper is presented by Jeffrey Badger, The Grinding Doc, New York; Peter Krajnik, Chalmers University of Technology, Gothenburg, Sweden; Radovan Dražumerič, University of Ljubljana, Slovenia; Richard Dogén, Jonas Trepp, Pontus Andreasson and Anders Berglund, Scania CV AB, Södertälje, Sweden. The figures included here have been adapted from the International Academy for Production Engineering (CIRP) paper on the "Cycle optimization in cam-lobe grinding for high productivity," published in 2014.

The first automobile internal-combustion engines used a camshaft to open and close poppet valves. Now, more than 100 years later, camshafts are still used and their basic function hasn't changed—even though camshaft geometries, materials, surface finishes and tolerances have improved greatly to achieve better fuel economy, lower emissions and larger torque.
In spite of this, producing camshafts still poses significant challenges, particularly with respect to grinding. Part tolerances have become tighter, surface finishes finer, and parts must be free of any temperature-induced thermal damage. Previously, machine builders, wheel suppliers, researchers and cam producers all operated somewhat independently of each other—to the determent of the final product. However, significant advances have been made by bringing independent experts together and pooling their individual areas of expertise.
Camshafts for heavy-duty diesel engines are typically made of hardened steel. Their final dimensions are produced on high-precision, million-dollar-plus CNC grinding machines using wheels made of CBN, a man-made abrasive that was first synthesized in the 1950s and is second in hardness only to diamond. One of the more difficult production requirements is that the camshaft must not have suffered "grinding burn" during grinding. Grinding burn, or thermal damage, occurs when the workpiece material properties are changed, usually detrimentally, because of high grinding temperatures. At moderately high temperatures, the workpiece is tempered and loses its hardness. At higher temperatures, it develops residual tensile stresses, which decrease the camshaft's fatigue life. And at very high temperatures, the camshaft experiences a phase change in the metallurgy, which can cause cracking, either immediately or during service.
Cam grinding is one of the more complex grinding operations. This is because of the cam's geometry. In standard, grinding wheel is fed into the outside surface in controlled relation to the axis of rotation. Th…" title="Grinding operation in which the workpiece is rotated around a fixed axis while the grinding wheel is fed into the outside surface in controlled relation to the axis of rotation. Th…" aria-label="Glossary: cylindrical grinding">cylindrical grinding, such as for producing shafts and pistons, as the workpiece rotates and the wheel plunges in, the material-removal rate and wheel-workpiece contact area are both constant. This allows grinding engineers to accurately predict what's happening in the grinding zone and avoid high grinding temperatures.
Cam grinding, in contrast, is "nonround grinding." Here, the workpiece rotates and the wheel feeds in, but the wheel-spindle assembly also simultaneously oscillates back and forth to produce the strange "egg shape" of the cam. Because of this odd geometry, there are surges in the mrr. These surges lead to several problems.
First, the chip thickness, or chip load, of the grits in the grinding wheel increases with each surge. This leads to more rapid wheel wear, which increases the amount of expensive CBN abrasive consumed and the cycle time, because of more frequent wheel dressing. Second, the contact area between the wheel and the workpiece changes throughout one workpiece revolution. Third, and most importantly, the surge in mrr leads to greater heat generation and higher grinding temperatures, which can cause grinding burn.


Figure 1. Camshaft. Credit. Wikipedia.

To combat the surges and their associated negative consequences, well-intentioned engineers and machine builders came up with constant-mrr cam grinding. Here the workpiece rotational velocity, or rpm, decreases during the surge region and increases during the light-cut region, speeding up and slowing down during each workpiece revolution.
But the road to grinding burn is paved with good intentions and this brought its own host of problems. First, when the workpiece slows down, the chip thickness decreases. A smaller chip thickness causes the CBN grits to rub more and cut less, leading to greater heat generation. Second, a slower workpiece velocity means a point on the workpiece spends more time in the "hot zone," which also leads to higher temperatures.
In other words, the benefit of decreasing the mrr during the danger zone was offset by greater grit rubbing and greater time in the hot zone, minimizing the benefit and, in some cases, making the situation worse. The result was a modest-at-best improvement in controlling grinding temperatures while increasing cycle times.
After the constant-mrr process came the constant-power process. Here, the grinding wheel spindle power was measured and, if the power exceeded some predetermined level, the workpiece rpm again slowed down. But this suffered the same issues as the constant-mrr process.
Currently, some companies use the constant-mrr process, some the constant-power process, and some stick with the constant-rpm process. And all of them use a trial-and-error process: They choose a set of speeds and feeds, somewhat arbitrarily, and grind a camshaft. Adjustments are made, mostly by operator intuition and feel. The workpiece is then sent to the lab for burn testing. If it passes, operators stick with these parameters. If not, more tweaks are made until eventually a cycle is found that gives burn-free grinding. It is part science, part shooting from the hip, part "grinding by feel" and part luck.

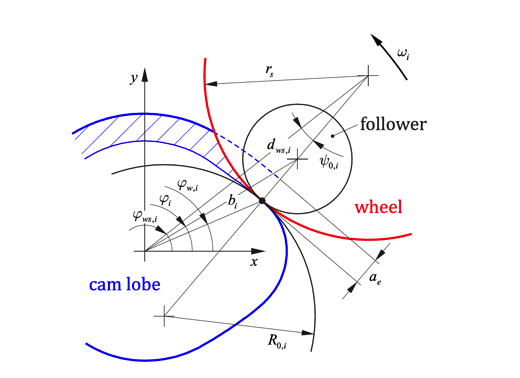
Figure 2. Cam-grinding geometry.

The Jaeger Model
In the 1970s, to avoid grinding burn, grinding engineers started applying the 1942 Jaeger moving-heat-source model to predict workpiece temperatures. Most used the specific energy, which is the energy required to remove one cubic millimeter of material. Specific energy depends on the average chip thickness, with a larger chip thickness giving less rubbing and, therefore, a lower specific energy. Once the characteristic curve of specific energy vs. chip thickness is determined, the fraction of heat entering the workpiece is estimated and a reasonable prediction of grinding temperature can be made, particularly when cylindrical grinding, where convection to the coolant is minimal and the geometries can be readily calculated.
In cam grinding, however, the chip thickness is difficult to calculate because of the ever-changing contact length. Therefore, temperature predictions had never been satisfactorily applied to cam grinding. In other words, the kinematics were complicated: The heat generation depended not only on the instantaneous mrr, but also on the specific energy, which changed not only throughout one workpiece revolution, but also through the ever-changing wheel-workpiece contact length.
To complicate matters, grinding machines have limitations on how fast the wheel-spindle assembly can oscillate back and forth, how quickly it can change direction and how quickly the workpiece can accelerate and decelerate. The concept of jerk plays a big role. Jerk is the third derivative of position, i.e. the change in acceleration. In this case, there were two jerks: the jerk in the wheel-spindle-assembly acceleration (how quickly the machine could change the linear acceleration of the wheel oscillation) and the jerk in the workpiece angular acceleration (how fast the machine could change the rotational acceleration of the workpiece).
The result of all these complications in cam grinding was a sort-of try-it-and-hope-and-then-test-it-and-hope approach to grinding, as described previously. Eventually, the operator would find some parameters that worked. And then he would guard these parameters with his life.
A Meeting of Minds
In 2013, three engineers previously working together on nonround cylindrical grinding met and started discussing cam grinding. Peter Krajnik from Sweden had a Ph.D. in grinding and was working at Scania, one of the world's leading producers of commercial vehicles; Radovan Dražumerič from Slovenia had a Ph.D. in mechanics and was working at the University of Ljubljana; and Jeff Badger from the U.S. had a Ph.D. in grinding and was working as an independent expert consultant in grinding, calling himself "The Grinding Doc." Krajnik identified the complexities of cam grinding, Badger said he'd always avoided it due to the complex kinematics, and Dražumerič said kinematics were easy, but admitted he knew nothing about grinding. They then solicited the advice of Dr. Stephen Malkin of the University of Massachusetts at Amherst, a person considered "the Godfather of grinding" and "the guy who wrote the book on grinding" (Grinding Technology, Ellis Horwood Ltd., 1989). Malkin said cam grinding is complex and, therefore, took an interest.
Badger, Krajnik and Dražumerič developed a process called constant-temperature grinding (CTG). The complex kinematics and ever-changing geometry of grinding were determined and then the Jaeger model was applied. Next, the characteristic specific-energy vs. chip-thickness curve was determined via a quick experiment on the machine while grinding under cylindrical-grinding conditions. Now, the amount of abrasive-grit rubbing vs. cutting could be determined at every single point along the wheel/workpiece interface and, hence, the amount of heat generation was known. This curve was then input into the model to search for the optimal conditions that would give not a constant rpm or constant power, but rather a constant temperature—in this case 450° C, which was below the burn threshold.
Next, the machine constraints were added to the model. The engineers worked with a CNC machine builder to determine the machine jerk limitations. Without machine constrains, the shortest cycle time occurred at a small grinding DOC but a fast workpiece rpm. This meant that the workpiece rotational jerk and the wheelhead linear jerk were enormous. When the machine constraints were introduced, the optimum constant-temperature conditions changed. The results are shown in Figure 3.

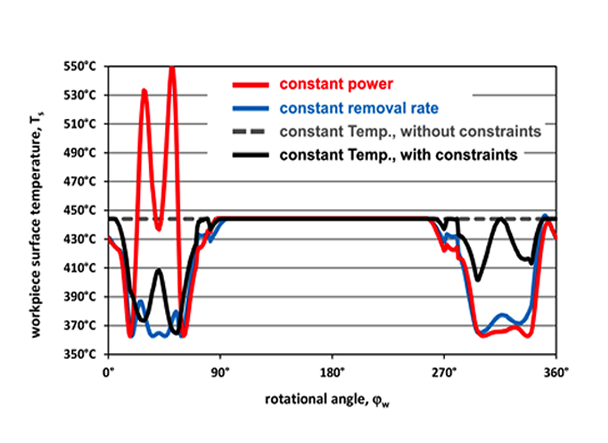
Figure 3. Predicted workpiece surface temperature of constant-mrr, -power and -temperature processes.

For a burn-threshold of 450° C, the optimal number of increments was 21. However, stricter temperature controls could be used, such as setting a temperature threshold of 400° C. This changed the optimal number of increments to 25. A more lenient temperature control could also be used. For example, a temperature threshold of 600° C could be used, requiring 14 increments and giving a shorter cycle time. In the end, a temperature threshold of 441° C was chosen.

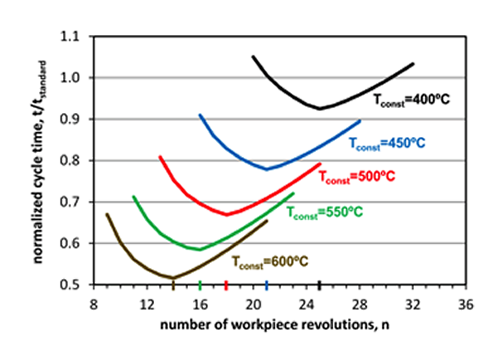
Figure 4. Nominalized cycle time based and number of workpiece increments based on workpiece surface temperature.

Cams were then ground with the new cycle. Surface finish and workpiece geometries were measured to determine if the final part met the tolerance specifications. Next, grinding burn was measured.
Grinding burn is notoriously difficult to measure and quantify. Previously, the only ways to evaluate grinding burn were: 1) to cut, polish and etch the workpiece and examine its microstructure under a microscope, looking for "white layer"; 2) to remove a small section and send it for X-ray-diffraction measurement; or 3) to dip the entire part in nitric acid and look for white layer. All are time-consuming, and the first two are destructive.
Fortunately, developments by Stresstech OY in Finland allow for nondestructive testing by using Barkhausen Noise to detect softening, residual tensile stresses and phase changes in the material. Scania sends all camshafts through a vigorous Barkhausen Noise test routine to assure 100 percent quality of its production.
The results of Barkhausen measurements are show in Figure 5, which indicates that the Barkhausen Noise value was held below a predetermined safe-threshold level.

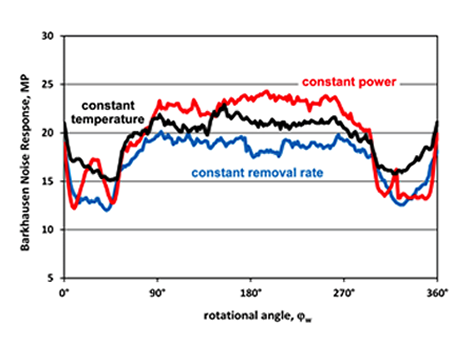
Figure 5. Barkhausen Noise response.

One of the main goals of the project was to reduce cycle time. Cycle time in CTG was reduced 20 percent compared to constant mrr and 40 percent compared to constant power. For a company producing thousands of camshafts a week, where one grinding machine costs more than $1 million, this translates into significant cost savings, not to mention a more robust, reliable process.
Scania has implemented the new CTG cycle into all its production machines in its engine-production plant in Södertälje, Sweden. A vigorous testing program of surface finish, tolerance and Barkhausen Noise continues as normal, with all parts meeting rigid specifications.
Collaboration
The technology and innovations presented here were the result of an industry-academia partnership, bringing together senior research experts and consultants on the "technology-push side" and engineering managers, process planners and machine operators on the "technology-pull side." Grinding used to be a skill of machinists, who learned on the shop floor by trial and error and often performed grinding by feel and experience. However, grinding has become so complex that no one person or company can understand all aspects of it completely, and many grinding experts specialize in a subset of a subset of grinding, such as chatter in centerless grinding.
Machine builders are experts in building machines, but aren't experts in the kinematics and dynamics of transient wheel-workpiece geometry. Ph.D.-level experts in kinematics and dynamics cannot be expected to also know about the tribology of abrasive processes. And grinding experts may know about thermal modeling of the grinding process, but don't necessarily understand the peculiarities of Barkhausen Noise measurements.
Currently, most grinding machine builders build a machine, hand it over to the end user and say "good luck." End users are then on their own in developing a cycle. Grinding wheel and coolant manufacturers often take a similar approach. The result is that end users are hoping for support on grinding, but not receiving it.
However, things are changing, and some machine builders are developing partnerships with wheel producers, various grinding experts, coolant manufacturers and end users to provide a "grinding solution." It appears that as grinding becomes more complex, this may be best and only method to provide a truly optimized, robust and consistent process.


