Tips for a manual milling machine

Author Tom Lipton
Published
December 01, 2012 - 11:15am

In my October column, I explained how the design of manual milling machines could be improved. This month, I share some tips for enhancing the operation of a manual mill:

  • Get an indicator with a vertical dial. This beats craning your neck like a bird hunting a worm all around the mill when zeroing a part.
  • For tramming the head, make several long indicator holder bars to sweep a larger arc. If you have trouble indicating a bore you think should be round, check the head tram condition. Typically, you would see a longer direction or equal but mismatched numbers. If the head is out, you’re out on your head.

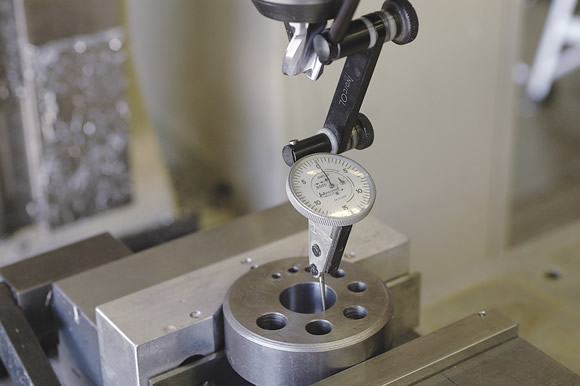
Using an indicator with a vertical dial beats craning your neck when zeroing a part. All images courtesy T. Lipton.

  • Button-type indicators slide over the T-slots easier than a test indicator when tramming.
  • Use a high-quality combination square on the mill. You will be surprised how close you can get. I checked one of my combination squares against a master square comparator and was happy to find it was within 0.002 " of square at 10 " off the surface plate.
  • Prior to discovering special-toothed wedges, I used 5/8 " dowel pins as backstops in the mill like everybody else. But the wedges fit tightly in a T-slot of any width. You can easily vary the height and even use them for special clamping jobs.

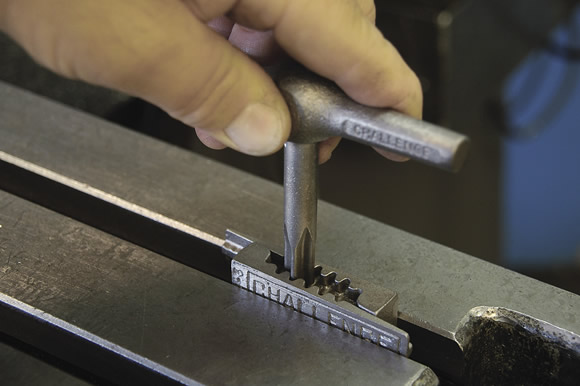
Special-toothed wedges are effective as backstops in a mill.

  • Cut the long shanks off your drill chucks. The R-8 collet is only 1 " long inside. How much shank do you need up there? Consider all the time you spend cranking the knee up and down to get the chuck in and out of that long shank. For that matter, lose the R-8 shank on your drill chuck. If you have a 5/8 "-dia. straight shank on the drill chuck, you will save hundreds of collet changes a year if you buy a few common-sized endmills with the same shank size as the drill chuck.
  • Buy two drill chucks with different diameter shanks on them. This allows you to save time on tool changes when you have the same shank diameter as your cutting tools.
  • Don’t put an endmill in a quick-change drill chuck. This is tempting at times but is a pure rookie move. If the endmill chatters for a billionth of a second, the chuck loosens and all hell breaks loose!

Carefully hold your hand on the part when using tricky or dicey setups because your hand will detect a part shifting before your eye will.

  • Remove the drawbar every so often and put a drop of oil or light assembly lube on the threads. You should be able to spin this with your pinkie. If it doesn’t spin freely, get a new one.
  • Use the spindle motor to rapid traverse the collet out after you break it loose with a wrench. Hold only the drawbar lightly with your fingers and catch the collet as it falls. 
  • Better yet, invest in a power drawbar, which has a quick payback. Unless you use a right-angle thread on a daily basis, the argument about slow changeover doesn’t hold water. Once you have tried a power drawbar, you will wonder how you managed without it. No more smashed fingers or wrenches ratting over your head.

Always caliper a stack of gage blocks to confirm your math. 

  • Hold your hand on the part when using tricky or dicey setups. Your hand will detect a part shifting before your eye will, giving instant feedback to the other hand that’s cranking the feed handle.
  • Get comfortable using a sine bar. These are simple-to-use, deadly accurate tools for setting angles. The sine bar should span the ways of a standard milling vise. Don’t think of these tools as too precious for everyday work. Smaller sine bars are handy for manual mill work. One with a 3" to 5" center distance is ideal.
  • Use a sine bar to set head or vise angles. You can also sweep the face of the bar just like you would when tramming the head to set a precision angle.
  • Use a gage pin to quickly set your sine bar. This can eliminate stack-up math errors using gage blocks. As a safety measure, always caliper a stack of blocks to confirm your math.    

Related Glossary Terms

  • chuck

    chuck

    Workholding device that affixes to a mill, lathe or drill-press spindle. It holds a tool or workpiece by one end, allowing it to be rotated. May also be fitted to the machine table to hold a workpiece. Two or more adjustable jaws actually hold the tool or part. May be actuated manually, pneumatically, hydraulically or electrically. See collet.

  • collet

    collet

    Flexible-sided device that secures a tool or workpiece. Similar in function to a chuck, but can accommodate only a narrow size range. Typically provides greater gripping force and precision than a chuck. See chuck.

  • endmill

    endmill

    Milling cutter held by its shank that cuts on its periphery and, if so configured, on its free end. Takes a variety of shapes (single- and double-end, roughing, ballnose and cup-end) and sizes (stub, medium, long and extra-long). Also comes with differing numbers of flutes.

  • feed

    feed

    Rate of change of position of the tool as a whole, relative to the workpiece while cutting.

  • gang cutting ( milling)

    gang cutting ( milling)

    Machining with several cutters mounted on a single arbor, generally for simultaneous cutting.

  • milling

    milling

    Machining operation in which metal or other material is removed by applying power to a rotating cutter. In vertical milling, the cutting tool is mounted vertically on the spindle. In horizontal milling, the cutting tool is mounted horizontally, either directly on the spindle or on an arbor. Horizontal milling is further broken down into conventional milling, where the cutter rotates opposite the direction of feed, or “up” into the workpiece; and climb milling, where the cutter rotates in the direction of feed, or “down” into the workpiece. Milling operations include plane or surface milling, endmilling, facemilling, angle milling, form milling and profiling.

  • milling machine ( mill)

    milling machine ( mill)

    Runs endmills and arbor-mounted milling cutters. Features include a head with a spindle that drives the cutters; a column, knee and table that provide motion in the three Cartesian axes; and a base that supports the components and houses the cutting-fluid pump and reservoir. The work is mounted on the table and fed into the rotating cutter or endmill to accomplish the milling steps; vertical milling machines also feed endmills into the work by means of a spindle-mounted quill. Models range from small manual machines to big bed-type and duplex mills. All take one of three basic forms: vertical, horizontal or convertible horizontal/vertical. Vertical machines may be knee-type (the table is mounted on a knee that can be elevated) or bed-type (the table is securely supported and only moves horizontally). In general, horizontal machines are bigger and more powerful, while vertical machines are lighter but more versatile and easier to set up and operate.

  • rapid traverse

    rapid traverse

    Movement on a CNC mill or lathe that is from point to point at full speed but, usually, without linear interpolation.

  • shank

    shank

    Main body of a tool; the portion of a drill or similar end-held tool that fits into a collet, chuck or similar mounting device.

Author

Tom Lipton is a career metalworker from the San Francisco Bay area who has worked at various job shops. For more information, visit his blog and YouTube video channel.