M codes are like switches. Anytime you use an M code in a program, you are generally either switching something on or off or actuating something, such as coolant (M8 or M9), the spindle (M3 or M4) or the toolchanger (M6). M codes have other functions as well.
Use the EOB (end of block) button to complete a line of code and the write/enter button to enter that line of code into the MDI (manual data input) screen. When you are done with a line or block of code, press the EOB button. Doing so will input a semicolon at the end of that line of code.
The semicolon is necessary; it tells the controller you are done inputting code on that line or block. The code will appear in the lower left corner of the screen as you type. Note that you don’t need to type in any spaces. The controller puts spaces in for you once you “enter” the information.
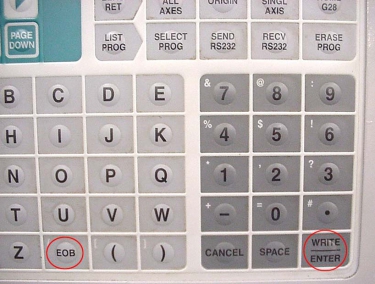
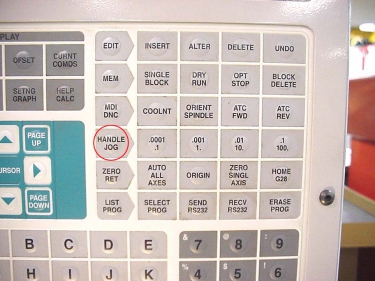
This part of the controller (left) shows the end-of-block and write/enter buttons. Once in handle-jog
mode (right), you can pick the incremental amount you want the table to move for each click
of the handle dial. Images courtesy of J. Harvey
Pressing the write/enter button will enter the typed code into the MDI screen, where it can be run.
The home button and its neighboring buttons allow you to move around the program while you are writing and correcting code. Press the home button to return the cursor to the beginning of the program. The other buttons, such as end and page up, and the arrows work much as a regular computer keyboard keys work for navigating a document or spreadsheet.
Press the green cycle-start button to run the program. If the spindle turns on, which it should, you have successfully written and executed a short program.
Several additional buttons are helpful as you write your program. Press the spindle+ and spindle- buttons to manually change the spindle speed. Press the stop button and the CW (clockwise) and CCW (counterclockwise) buttons to manually stop and start the spindle rotation and direction.
Use handle-jog mode to move the table manually. Press the handle-jog button to get into handle-jog mode. Then rotate the hand dial to move the table.
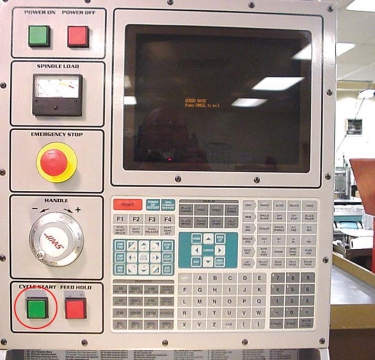
When you’re ready to run a program, press the cycle-start button. Image courtesy of J. Harvey
Although we know the table is the item that is actually moving during lateral movements, our minds perceive these movements as the spindle head moving. This perception actually works in our favor because it is more in line with how we think about things while indicating, edge finding and machining.
Therefore, in an effort to maintain clarity and consistency, I’m going to refer to any lateral movements as spindle movements. When I say the spindle is moving in an X-positive direction, in reality the table is moving in an X-negative direction.
Once in handle-jog mode, you can select the axis you want to move along and choose the increment or “speed” at which you want to move. You have to be careful here. It’s been my experience that a lot of crashes are caused by careless handle jogging.
If you push the .01-increment button, then each click of the hand dial will move the spindle/table 0.010". You have to be especially careful when moving 0.1" per click because things happen quickly at that setting.
The only time you need to choose between a plus-axis or minus-axis button is when you want to lock the movement of the spindle or table in a specific direction in handle-jog mode. You do that with the jog-lock button.
Take some time to cruise around in handle-jog mode, changing axes and increments until you get used to how the machine responds. You’ll spend a lot time in this mode to indicate parts and find their edges.
The manual that comes with a machine will provide all the needed details about the machine and its control. Frankly, though, I dislike reading manuals. I’d rather have a person familiar with a machine go over it with me. A person showing you how to do something can filter unneeded information.
Related Glossary Terms
- coolant
coolant
Fluid that reduces temperature buildup at the tool/workpiece interface during machining. Normally takes the form of a liquid such as soluble or chemical mixtures (semisynthetic, synthetic) but can be pressurized air or other gas. Because of water’s ability to absorb great quantities of heat, it is widely used as a coolant and vehicle for various cutting compounds, with the water-to-compound ratio varying with the machining task. See cutting fluid; semisynthetic cutting fluid; soluble-oil cutting fluid; synthetic cutting fluid.
- toolchanger
toolchanger
Carriage or drum attached to a machining center that holds tools until needed; when a tool is needed, the toolchanger inserts the tool into the machine spindle. See automatic toolchanger.
Author

James A. Harvey is a machinist and moldmaker who has worked in shops across the U.S. for nearly 40 years. Harvey’s Shop Operations column for Cutting Tool Engineering magazine is adapted from information in his book “CNC Trade Secrets: A Guide to CNC Machine Shop Practices,” published by Industrial Press Inc., South Norwalk, Conn. The publisher can be reached by calling (888) 528-7852 or visiting www.industrialpress.com. By indicating the code CTE20OFF when ordering, CTE readers will receive a 20 percent discount off the book’s list price of $29.95.