How to measure diameters is one of the fundamental tasks that a machinist needs to know. It’s not difficult, but there is a technique that helps ensure that a measurement is correct.
Calipers are quick and easy to use. Micrometers for OD measurements and telescope (snap) gauges used with micrometers for ID measurements give more accurate measurements than calipers but require a little more skill.
I’ve been in this game for over 40 years. Here are a few things I have learned.
The first thing to recognize is that the quality of the tools you use is paramount. A faulty tool is an expensive tool. It gives measurement errors that waste time and products. A good tool does what you want. Measurement tools with moving parts need to be made with tight tolerance from quality material.
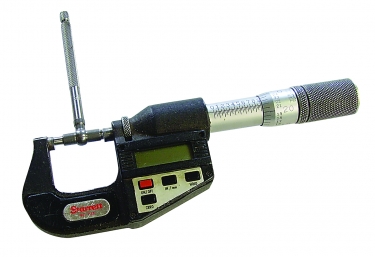
L.S. Starrett makes snap gauges. Image courtesy of B. Taylor
Calipers have a carriage that slides on a beam. Jaws protrude at right angles from the beam and carriage and are held against a part to make a measurement. Clearance between the beam and carriage allows the beam to rock on the carriage. When holding the caliper by the beam and pushing the carriage against the part with a thumb, it is easy to get a measurement error from rocking the carriage and putting a torque load on the beam. It’s better to hold the caliper by the jaws using two hands, with one hand pressing each jaw at the point of contact with the part being measured.
If the measurement needs accuracy better than 0.0508 mm (0.002"), using a caliper is risky. Resolution may be 0.0127 mm (0.0005"), but accuracy is +/-0.0254 mm (0.001") or more.
Micrometers are inherently more accurate than calipers because the measurement surfaces and axis of the measurement mechanism are all in line. The mechanism is a screw. It has to be tightened properly on a part to get the right measurement. The frame of the micrometer is made beefy so there is less chance of getting an error from bending. But care still is required. A micrometer is not a C-clamp. Some micrometers have a mechanism in the thimble to prevent over-tightening, cutting down on operator error.
The other source of operator error is when measuring with the instrument cocked on the workpiece. It takes a little practice to learn to properly use a mike. A good way to gain this skill is to check mike calibration with a gauge block every time you put it to work. For example, calibrate a 25.4 mm (1") mike with a 25.4 mm gauge block. Make sure the block and mike faces are clean. If the mike gives a high reading, rock the block in the mike a little and try again. Repeat until you get the minimum measurement. That should be your 25.4 mm reading. This also gives a feel for how to tighten the thimble. And this is a good safety precaution when using an electronic mike, which easily can change the calibration by mistake. This little exercise saves time and trouble when making measurements that matter.
Here is one thing to keep in mind about electronic mikes. Some have a conventional micrometer scale on the barrel, as well as the electronic readout. It’s easy to see whether the mike scale and readout correlate. I recommend this feature since all it takes is the mistaken touch of a button to put the readout out of whack. Without the mechanical backup, you could be working in error.
To make ID measurements, I prefer a snap gauge used with a mike. With a little practice, you can measure tenths of an inch with a good snap gauge. It has two hollow rods with crowned ends that enclose a spring. The rods with a spring are held in a T-handle, which has a screw end that pushes against the rods to hold them in place. The gauge is placed in the bore to be measured with the handle sticking out and the two crowned rod ends against opposite sides of the bore. The handle is cocked away from the axial centerline of the bore, and the screw is tightened slightly to immobilize the hollow rods. Then the handle is moved with one finger toward the bore centerline and beyond. The gauge will self-center in the bore while the hollow rods are compressed into each other. When the gauge reaches just beyond the radial centerline, the gauge will be released from contact with the bore while maintaining the bore dimension. Then the length between the two crowned surfaces is measured with a mike.
It is simple in theory but takes a bit of practice, and the snap gauge has to work correctly. A sloppy gauge gives a measurement that is bigger than what the bore actually is. My experience is that The L.S. Starrett Co. in Athol, Massachusetts, makes good stuff.
Technique for a Snap Gauge
1. Put oil on the crowned face of the gauge that will drag across the bore diameter. This helps the gauge find the radial centerline.
2. Use a light touch when tightening the screw before the measurement, and then tighten a little more so the mike won’t alter the measurement.
3. Like when checking the mike with a gauge block, cock the gauge around in the mike, but now look for the biggest measurement. That’s the one you want.
4. Repeat the process a few times looking for the biggest measurement. Get it a couple of times, and you’re there.
5. Small bores are easier to do than big ones.
After a while, good technique becomes second nature. There’s satisfaction in a job well done.
Related Glossary Terms
- calibration
calibration
Checking measuring instruments and devices against a master set to ensure that, over time, they have remained dimensionally stable and nominally accurate.
- clearance
clearance
Space provided behind a tool’s land or relief to prevent rubbing and subsequent premature deterioration of the tool. See land; relief.
- inner diameter ( ID)
inner diameter ( ID)
Dimension that defines the inside diameter of a cavity or hole. See OD, outer diameter.
- micrometer
micrometer
A precision instrument with a spindle moved by a finely threaded screw that is used for measuring thickness and short lengths.
- outer diameter ( OD)
outer diameter ( OD)
Dimension that defines the exterior diameter of a cylindrical or round part. See ID, inner diameter.
- tolerance
tolerance
Minimum and maximum amount a workpiece dimension is allowed to vary from a set standard and still be acceptable.
Author

Brandt Taylor is owner of Berlin, Massachusetts-based Taylor Engineering, a machine shop.