Moire contouring enhances machine vision inspection of part surface features that are difficult to measure.
Machine vision systems have come a long way in their ability to analyze part surfaces quickly, reliably, and accurately. However, many inspection tasks require a means of identifying large changes in depth to measure machined features that are difficult to see because there are no sharp edges or lighting contrasts to define their shape. These features include bevels, tapers, counterbores, or curvatures in the part surface.
Sometimes shading techniques and stereo techniques allow these features to be seen with a machine vision system. Shading techniques involve casting shadows on the part surface with light from the side. Such methods, however, can’t always distinguish machined features from dirt or surface-finish variations, which are expected on machined parts. A dark grease line can look like a shadow of an edge, for instance. Stereo techniques require some common reference point on the part surface for the two camera views to be correlated. Such a point may not exist if the surface being inspected is a smooth, continuous curve. In addition, the accuracy in determining the location of this reference point is limited by the resolution of the camera, and one point does not provide information about other points on the surface.
Moire contouring is an extension of structured lighting, which has proven to be a useful tool in enhancing surface features that are hard to see. The principle behind structured lighting is to illuminate the part surface with a line of light and view the resulting shape of the line at an angle other than the illuminating angle (Figure 1). As the depth of the part changes, the line intersects the surface at different points and appears to move from side to side. The line also appears to follow any curves in the surface.
The effects of structured lighting are due to the triangulation between the angle at which the line is projected and the angle from which the surface is viewed. The line of light creates a series of points that trace out the surface in such a way that it appears as though the part has been cut along that line. That is, a line of light will produce a profile of the surface as seen from the perspective of the video-based system.
Illuminating the part surface with more than one line provides more information in one view, but it soon becomes difficult to keep track of the lines, since they all look the same. Using an optical projection system with fine resolution allows the video-based viewing system to know which line is being viewed and to measure a small displacement of the line. Moire contouring is a noncontact measurement technique that eliminates the need for the video-based system to directly analyze the position of each individual line. The optical projection system itself sorts out the pattern of lines into a form that is easy to analyze.
How Moire Works
Moire encodes small changes in depth on the part surface into a larger 2-D pattern that can be interpreted by a video-based system (Figure 2). A diagram of a simple projection moire system is shown in Figure 3. The master grating and reference grating are typically the same pattern; both are created by printing, photographing, or etching a series of lines on glass. The master grating is projected through a lens onto the part surface. The pattern formed by the lines of light as they strike the part is called the subject grating. This pattern is viewed through a second lens and a reference grating at an angle different from the illumination angle.
By viewing the resulting image through the reference grating, the video-based system overlays the reference grating and the subject grating. Assuming that the reference grating is made up of straight lines, overlaying the two grating images produces a pattern of light and dark areas called fringes (Figure 4). The fringes form a contour map of the part’s surface in the same way that a topographic map delineates the contours of the land.
As an illustration of the pattern produced, Figure 5 shows the moire pattern of a soap bottle, along with the 3-D map that was created using data interpreted from the fringes. For this example, a grating was placed in front of the bottle and simply shadowed onto it; then the shadow was viewed through the original grating at an angle different from the angle of the light shining through the grating. This shadow moire effect can often be seen in everyday situations, such as the pattern seen when an object is viewed through a screen door.
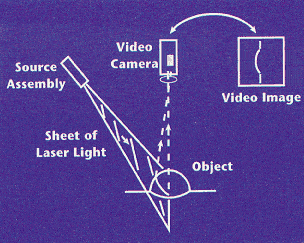 |
Figure 1. Moire contouring is based on the principle of structured lighting. |
Interpreting the Pattern
The visual interpretation of moire contouring is simple. Each fringe follows the part surface at a constant depth range from the video-based system. This means that every point along a fringe is at the same depth. A tilt in the part surface will produce evenly spaced lines, whereas a bend or twist will show up as variable spacing. The types of changes in the fringes produced by different surface slopes are illustrated in Figure 6. Because the fringes are a function of the surface’s shape, the moire pattern will look the same wherever the part is and whatever orientation the part is in within the view of the optical system.
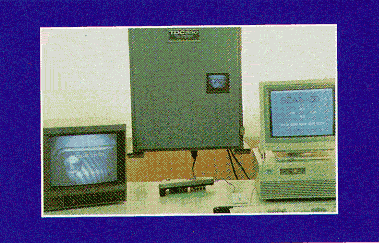
| Figure 2. | A typical video-based moire inspection system. The optical head (center) contains the projection system and camera. The video monitor (left) shows the moire image of a stamped metal part (lower center). The computer system (right) contains an image-processing board for fast, quantitative analysis of surface shape. |
Because the moire pattern is a direct representation of changes in depth on the part surface, the video-based system doesn’t need to analyze each individual subject grating line. In this way, moire provides a degree of preprocessing within the optical system. Many optical glass-scale measuring systems in machine tools and robots use a moire pattern between two gratings, because it is much easier to see and measure a pattern of large moire lines than to resolve the deviations of a very small grating line.
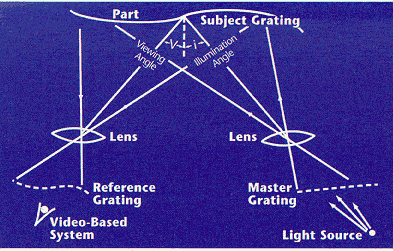 |
Figure 3. A simple projection moire system used for making contour patterns. |
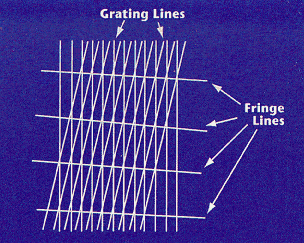 |
Figure 4. Fringes created by overlaying two grating images. |
If the reference grating is made by recording the image of the grating lines on a part, then the moire pattern that is created when the grating lines on another part are viewed through this reference grating will show only the differences between the two parts. If a standard part or a part in some standard state is used to create the reference grating, the moire pattern can be used to show only deviations from a good part. This means that the moire image is blank except for where deviations occur. This method of moire-based measurement is referred to as difference moire. When applied to an online inspection system, difference moire greatly reduces the amount of information to be analyzed to determine whether or not a part is within tolerances. This comparison effect is another way that moire simplifies the data analysis done by the video-based system.
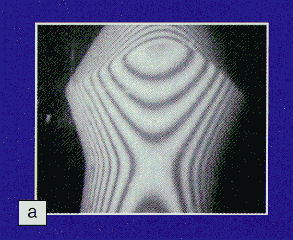
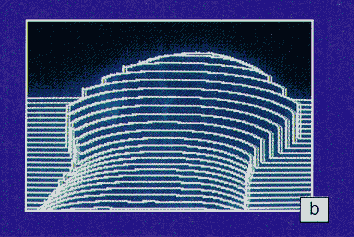
| Figure 5. | Moire pattern on a soap bottle (a>, delineating areas of constant depth, and the subsequent 3-D map generated from the fringes (b). |
Furthermore, by amplifying a very small displacement of a grating line, moire contouring magnifies the pattern’s sensitivity, which is the smallest change that can be seen by the optical system. The following equation is used to calculate the sensitivity per fringe, or the change in depth indicated by going from one fringe to the next:
p/[tan(i) + tan(v)]
p = the grating period on the part (the distance between subject grating lines)
i = the angle at which the projected grating pattern falls on the part
v = the viewing angle.
Typically, with digitizing methods, changes in the position of fringes can be measured to 1/10 to 1/40 of a fringe. With such methods, a sensitivity of 0.001" over a full field of a few square feet is not unreasonable, with higher sensitivity over small areas. For example, over 1 sq. ft., the sensitivity could exceed 0.0005"; over 1 sq. in., changes as small as 10µin. have been recorded using moire techniques. The particular sensitivity that would be practical depends on many factors such as part geometry, optical system resolution, and analysis method. The sensitivity of the moire pattern can be tailored to fit a specific requirement by adjusting the grating period.
Analysis Methods
Computer analysis of moire fringe data is much simpler than analysis of a full-feature, digitized image. The information has already been separated dimensionally into 2-D and depth information, and the depth information has been encoded into a 2-D line drawing, each line representing a change in depth of a fixed amount. Interpretation of this data depends on the nature of the operation. If only recognition and location of a part are desired, the simple geometric features that were "learned" by the computer using a template match or similar method can be looked up and compared to the test data quickly. Parts can be measured by analyzing the full fringe data in all areas of interest. If only the deviations from a good part are of interest, difference moire can be used, thereby greatly reducing the data to be analyzed.
Regardless of how it is to be used, the data encoded in a moire pattern can be read and interpreted easily. Peaks and valleys can be distinguished readily and measured accurately. The sign of the slope being measured can be determined by a range of methods. For example, if one grating is moved with respect to another, the fringes will move in different directions depending on whether the slope is positive or negative. As an alternative, recordings of the part in two different positions can be compared. Specific designs using moire methods to record data can accomplish these tasks and lend themselves well to simple vision-system implementation.
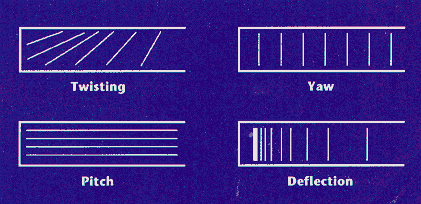 |
Figure 6. Typical fringe orientations resulting from changes in the shape or slope of the part surface. |
Many facilities and interferometer manufacturers have incorporated computer systems much like those used for moire contouring to digitize and analyze fringe data. A simple approach is to use the fringes as actual topographic lines of equal contour. Line-following methods of machine vision are quite fast, though the information between the centers of the lines is not directly measured by this method.
Another approach is to use phase-shifting or field-shifting methods. Phase-shifting requires the use of multiple images, each with the part or the grating moved by a small amount. Since the pattern is actually a sine wave, the phase angle at each point along the wave can be calculated by this method. The actual depth value of each point or video pixel on the part is then available to the computer. In this case of phase-shifting analysis, changes in depth can be available to an accuracy of about 0.0001".
A limitation of direct phase-shifting analysis is the loss of surface-position information if the moire pattern is disrupted, which may occur when going past a sharp change in depth on the part surface. Field shifting is an extension of phase shifting that further allows absolute measurements to be made. The field shift effectively changes the sensitivity of the moire contour by a small amount, thereby allowing a “coarse” vernier effect.
Moire Advantages
Moire effectively encodes changes in depth into a 2-D map that is easy for the computer system to analyze. The 2-D features on the horizontal plane of the part surface can be separated from the depth features on the vertical plane, which means the 2-D outlines can be analyzed separately using well-established vision algorithms. According to vendor literature, features as small as 0.001" can typically be detected with these systems. Using slower image-scanning systems or smaller fields of view, 2-D measurements can be made to better than 0.0001" over a 1" field of view. Featureless surfaces can be measured easily, because depth is not dependent on feature correlation.
Since moire is a full-field method, the contour of an entire area of a part can be mapped out at one time and recorded during a single video frame. This allows anomalies and large-scale geometric features to be viewed and measured to the same precision and at the same time (important in situations where thermal drifts or other factors may be warping the part with time). Small local anomalies that might be missed using a point-by-point measurement method will not be missed with a full-field approach, since there are no unmeasured areas.
Full-field contouring typically is much faster than point-by-point or line-by-line methods, which can provide no full-scale visualization until the data is completely recorded and analyzed. The immediate visualization feature of a full-field system provides the operator with a picture of the entire part. A full-field moire contour can be made in real time. The instantaneous contour plot can be viewed immediately, with high-accuracy numerical results available after a reasonable amount of analysis time. Such real-time viewing of a part is a common practice in fabricating high-quality optical components to tolerances of a few microinches.
Using moire contouring, the changes in depth can be averaged over an area of the surface. Methods that measure the contour along a line or use specific points on the part for stereo recognition are sensitive to very small area anomalies. Even if the person using this data only wants to measure large-scale changes in depth, these minute changes must still be recorded by the computer to maintain the desired accuracy, then integrated in software. The small-area information is still available with moire contouring, but the information can be optically integrated over larger areas to provide a picture of the entire part or viewing area at once (in a parallel manner) by reducing the spatial resolution to that desired.
The moire process can be adjusted to fit the need of a particular measurement by changing either the period of the grating or the angles of illumination and viewing of the part. The sensitivity of the moire contour also can be adjusted quickly with automated processes to fit the measurement. Work has been done at the Florida Institute of Technology using liquid crystal displays to produce both variable and customized grating patterns. The customized grating pattern can even be displayed as a number or a letter to designate when the part is in the correct position or to identify the part. This level of information processing by moire can provide almost instantaneous recognition operations for very high-speed applications. In other applications, it may be desirable to make a large field measurement at one sensitivity, then zoom in on an area with much higher sensitivity, simply by changing the frequency (number of lines per inch) of the grating projected.
Applications
The characteristics of moire machine vision make it suitable for industrial applications that are problematic for other systems. Stray light and lighting variations can be filtered out by viewing only the colored light used to project the grating, or ignored by using electronic thresholding techniques or other image-enhancement methods. Unlike techniques that depend on surface marks or shading effects, moire contouring can be used effectively in dirty or hostile environments. Such environments often exist in automated manufacturing operations such as tool-and-die applications.
The application of moire technology to manufacturing provides a particular set of capabilities for a range of applications that require fine depth measurement and high data density. Examples include stamping dies to verify detailed shape features, performing reverse engineering of complicated shapes such as clay models, measuring the rate and shape of wear on cutting tools, and inspecting surface features such as porosity or scratches on metals. Moire is used on both milled and ground surfaces and on formed materials such as formed sheet metal and molded plastics.
Because moire contouring is noncontact, the surface finish of the part will not be scratched or damaged in any way. The chances of damaging a high-tolerance surface finish with a contact method can be very high. Noncontact measurement methods can also relieve the time and mechanical complexity associated with most contact measurement systems. For instance, a typical noncontact measurement system produces 50,000 points per second, while a typical contact measurement system produces 1 point per second.
As with any triangulation-based method, moire needs to be used in an area where there is enough room to illuminate and view the surface of interest at different angles. A larger angle between the illumination and viewing allows for better sensitivity. If the surface itself is very rough, like a surface produced by sandcasting, then that grating may not produce a good pattern compared to the spacing of the grating on the surface of the part. A very fine grating pattern used to obtain high sensitivity is only viable on a fairly smooth surface, and such a grating will have a fairly limited depth of field. A pattern of 0.010" period, made to produce measurements of less than 0.001", will likely be usable only over a depth of 1" or less before it goes out of focus.
Using a full-field method such as moire contouring does not make sense if particular points or cross-sections are the only areas of interest. For example, moire is not the most effective method for finding the distance between two drilled holes or for determining the angle of a flat surface. One image from a full-field technique like moire can provide more than 250,000 points of data. If only a few hundred points are of interest, other methods, such as using a touch probe, would be better suited to the task. A method such as moire contouring is best used where continuously, gently curving surfaces with open access are of interest.
Moire contouring has been in use for many years as a visual aid to precision craftsmen. As a tool for enhancing machine vision inspection, moire brings out surface features that are difficult to see. Used for measurement, moire analysis can provide very fine detail on tooling or dies. On turned parts, moire helps detect small changes in part diameter that might otherwise be undetectable. The presence of features with flaws can be verified more easily by using moire with vision-based template-matching routines. Moire also can be used to distinguish different beveled countersinks and to identify and locate shallow counterbores. These applications of moire show its potential for simplifying difficult machine vision inspection tasks.
About the Author
Kevin Harding is scientific fellow at Industrial Technology Institute, Ann Arbor, MI. He also serves as director, Optics and Vision Application Center, and manager, Metrology Application Center.
Related Glossary Terms
- 2-D
2-D
Way of displaying real-world objects on a flat surface, showing only height and width. This system uses only the X and Y axes.
- 3-D
3-D
Way of displaying real-world objects in a natural way by showing depth, height and width. This system uses the X, Y and Z axes.
- arbor
arbor
Shaft used for rotary support in machining applications. In grinding, the spindle for mounting the wheel; in milling and other cutting operations, the shaft for mounting the cutter.
- centers
centers
Cone-shaped pins that support a workpiece by one or two ends during machining. The centers fit into holes drilled in the workpiece ends. Centers that turn with the workpiece are called “live” centers; those that do not are called “dead” centers.
- flat ( screw flat)
flat ( screw flat)
Flat surface machined into the shank of a cutting tool for enhanced holding of the tool.
- land
land
Part of the tool body that remains after the flutes are cut.
- metrology
metrology
Science of measurement; the principles on which precision machining, quality control and inspection are based. See precision machining, measurement.
- parallel
parallel
Strip or block of precision-ground stock used to elevate a workpiece, while keeping it parallel to the worktable, to prevent cutter/table contact.
- vision system
vision system
System in which information is extracted from visual sensors to allow machines to react to changes in the manufacturing process.
