|
If you own or manage a job shop, think about how much of your organization’s time is consumed by setup, inspection and other activities that don’t generate revenue. Is it 10 percent of your time? Twenty percent? More? In my experience, up to 40 percent of a shop’s time can be devoted to nonvalue-adding activities. By minimizing these nonrevenue-generating functions, you can add a corresponding amount of work-generated revenue—without adding people or other resources. One sure way to beef up the bottom line is by reducing setup time, defined as the time that elapses between the production of the last good part on the existing order and completion of the first good part of the next order. What follows is a step-by-step setup-reduction program that my company, Carleton Technologies Inc., undertook a number of years ago to reduce setup times. The result was that we increased our revenue-generating activities without adding resources. Reduction Plan Step 1. Selected a machine. Our goal was to reduce the setup time for each machine in the shop by at least 75 percent. Obviously, we couldn’t reduce setup times on all machines simultaneously. So, we picked a lathe that we felt would allow us to hit our target. (Note: This process can be easily adapted to milling centers.) Step 2. Formed a team. We included machinists, setup personnel, supervisors, engineers and anyone else involved in the setup process. We began by developing a vision of setup reduction and then collectively agreed on a mission for the team. The team first characterized the existing situation. Specifically, we determined the average setup time to date (based on data collected during previous jobs) and machining-time estimates for upcoming jobs. Historically, setups were consuming an average of 4.2 hours. We chose a target setup time of less than 10 minutes—a 96 percent reduction. Once the target was agreed upon, we developed a team charter listing the steps in the setup process, who was responsible for performing them, the expected outcomes, when the steps should be accomplished, how records would be kept and identified resources available to assist in the process. In order to gauge how changing the setup procedure would impact other aspects of the manufacturing process, the team also collected data about part quality, capability indices, rejects, rework, productive time, customer satisfaction, first-piece inspection trends and variation based on statistical process control. Since we performed SPC for every job, we knew how much variation existed prior to our improvement efforts. In addition, we had previously collected data on the time required to produce different parts on the lathe. This allowed us to compare the earlier results with those obtained after initiating the new setup-reduction process and determine how throughput was being impacted, where variation was coming from and when it occurred. Figure 1 depicts the variation and trend we normally saw when beginning a new job. Variation began when tools and materials were changed. Adjusting and centering on the mean, inspecting and recentering, and tweaking offsets, speeds and feeds all contributed to the variation. After some time passed, the process settled down and became more predictable.
Step 3. Analyzed a setup. We videotaped a setup performed on the lathe, pointing the camera at the door of the machine and having the camera operator—with input from the machinist—narrate the actions taking place. We made sure to turn the camera on as soon as the last good part was completed and included everything up to the point when an acceptable part was produced for the next order. The visual and verbal information captured explained what the operator did when he wasn’t at the machine. When the video was completed, we assembled the team and reviewed the process. Next, on a flow chart, we recorded each action (or step) taken, as well as the time each action consumed. Then, for each step, we asked the following questions: Why do we do it? Is it still necessary to do it? Can it be eliminated? If not, can it be simplified or improved? Can it be moved offline? (See Figure 2.)
The first question, about why something is done, was crucial to understanding the setup process. The answer to the question often yielded the first improvements. Eliminating steps or simplifying them brought the next set of improvements, and so forth. Step 4. Identified internal and external setup steps. Based on the video and flow chart, we determined which activities could be performed while the machine was running the previous job (external operations). Those activities that could only be performed while the machine was shutdown were considered internal operations. Wherever possible, we converted internal operations to external ones to save as much time as possible.
For example, we used preset tooling whenever practical, made certain any tools and gages that needed to be changed were available, checked for missing items on our “shadow board” (a sheet of plywood on which we printed outlines of the tools that may be required during setup), downloaded CNC programs from the central PC file and made sure raw materials were always available. Step 5. Consolidated raw materials. We found that one family of parts we produced was made from a combination of 111 different alloys and stock diameters. Most of the alloys couldn’t be changed, but we could certainly control the size of material selected. After reviewing the situation, we decided to standardize on four diameters of round stock: 1/2", 1", 1 3/4" and 2 3/4". Economies of scale were realized by ordering larger quantities of each size of stock. Stock outages were eliminated, independent physical and chemical analyses were reduced, and less variation resulted by ordering greater quantities of material from the same lot. In addition, purchase orders, receipts, payments and issue transactions were reduced, and we could load one bar in the feeder and run several parts without changing stock. Another improvement we implemented is what I call the “bread man” process. We planned how much of each material we needed daily, weekly and monthly. Then, we met with our raw-material supplier, described what we were doing, and asked him to come in at regular intervals and replenish our supplies. For example, if we needed 10 bars of 1" 6061 aluminum weekly, and the supplier came in and there were only three bars on the shelf, he added seven. Doing this drastically reduced our overhead and allowed our people to be used for revenue-generating activities—not checking inventory. Step 6. Standardized tooling. Before initiating the setup-reduction process, we had an impressive inventory of inserts, including almost every geometry, grade and coating available from many different manufacturers. They were used to maximize specific machining processes. In reality, though, having all the different styles and grades proved detrimental to the overall system. Changing an insert at the start of each new part run meant changing from a stable process to an unstable process. By the time the process for the new part was stabilized, a lot of nonrevenue-generating time had elapsed and parts were scrapped. To improve the situation, we needed to change the way we machined different parts. We developed a matrix and selected tools that could be used across the spectrum of parts to be made. It wasn’t possible to make every part with the same tools, but many parts could be. The turret was standardized so that tools used for all parts were never removed and always remained in the same position. Likewise, tools that were changed had a standardized location. Step 7. Developed and flow-charted the new setup process. After standardizing the material and tooling, we created a flow chart that showed how the new setup procedure was to be performed. The chart was displayed prominently in the work area, serving as a constant reminder about the correct setup procedure. The flow chart also was used as a training tool for new people. Acceptance of the process required some flexibility on the workers’ part, since everybody tends to perform tasks in a slightly different way. All personnel had to agree to perform the setup the same way. Step 8. Created families of parts. Once the mechanical part of the process was completed, we turned our attention to scheduling and adjusting how parts moved through the shop. The team grouped parts to be machined into families, based on the materials they were manufactured from and the tooling used to produce them. It was helpful to create a matrix (Figure 3a). This step allowed us to run an array of parts—Families A-D—in one week (Figure 3b).
Note that on Monday of Week 2, we started with Family D. We did this because the schedule for Week 1 ended with Family D, and by starting Week 2 with D, we saved setup time. In this scenario, the only week that doesn’t include each family is Week 3. Still, think of the possibilities when responding to customer requests for lead-time or delivery information. All we needed to do was to look at the family schedule and, knowing what family the part fits into, confidently predict when it could be delivered. Rather than taking a helter-skelter approach to scheduling and hoping that things happen according to plan—which they never seem to do—this approach resulted in a quality product delivered on time at a reasonable cost. Finally, a checklist was developed that outlined the steps required to move from one family to another. This, coupled with the checklist already developed for how to perform a setup, resulted in an effective system of changing from one part to another. The important thing to remember is that parts can’t be treated as individual pieces. Instead, each part must be considered within the context of a family of parts. Economies of scale are not lost with this setup process. Rather, “economies of multiples” are created. Additional Steps There are a number of other steps that should be taken if you plan to adopt the setup-reduction process outlined above. They include the following: Reprogram existing parts to fit the new system. Resources will be required to reprogram your CNC to machine parts based on the new standardization. For example, if historically you finished a part feature by drilling, you may find with the new process that you will have to bore it to obtain the appropriate size. Establish ways to measure improvement. In order to gauge your progress, you should establish a baseline of how efficient your operation currently is before developing and implementing the process. This will require you to collect data. You might consider:
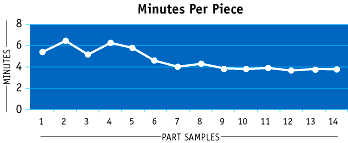
The data should be posted so its visible to all and as near to the machine or work cell as possible. In addition, utilize SPC for features generated by standardized tooling to predict the stability of the process. This will tell you when a change is warranted. List total setup times on a run chart. (Figure 4 depicts the progress we made in our setup-reduction efforts.)
Provide training on the new way of operating. Train everyone involved with the setup process. It is crucial that everyone work together and perform the setup the same way. To help ensure this, videotape the process after the improvements have been made. Require employees who haven’t been exposed to the process and new-hires to view the tape before operating the machine.
Develop a first-off capability. Following the previously outlined steps should stabilize production from part to part and job to job. Because tools aren’t changed as often, the first part run should always be a good one. In the real world, though, this is not always the case, because of programming anomalies, part geometry and other variables. Collect data on the capability of the process to produce a good part without making adjustments. One way to do this is by plotting the proportion of jobs per family that are acceptable without making any adjustments. The goal should be to eliminate shutting down the machine for an independent first-piece inspection, as that takes precious time away from activities that make money and increase customer satisfaction. Meeting Customer Needs Today’s manufacturing environment is driving job shops to rethink the way they run their operations. Customers are demanding shorter lead times, higher-quality parts, quicker response, and stable or reduced pricing. The setup-reduction process outlined in this article provided Carleton Technologies with the ability to meet those needs. Adopting the process will require a new way of thinking, a new way of operating and a new way of planning how you use tooling and machinery. The out-of-pocket costs will be small. But the competitive advantages gained and cost reductions realized will be significant. About the Author |
|||||||||||||||||||||||||||||||||||||||||||||||||||||||||||||||||||||||||||||||||||||||||||||||||||||||||||||||||||||||||||||||||||

Related Glossary Terms
- alloys
alloys
Substances having metallic properties and being composed of two or more chemical elements of which at least one is a metal.
- centering
centering
1. Process of locating the center of a workpiece to be mounted on centers. 2. Process of mounting the workpiece concentric to the machine spindle. See centers.
- centers
centers
Cone-shaped pins that support a workpiece by one or two ends during machining. The centers fit into holes drilled in the workpiece ends. Centers that turn with the workpiece are called “live” centers; those that do not are called “dead” centers.
- collet
collet
Flexible-sided device that secures a tool or workpiece. Similar in function to a chuck, but can accommodate only a narrow size range. Typically provides greater gripping force and precision than a chuck. See chuck.
- computer numerical control ( CNC)
computer numerical control ( CNC)
Microprocessor-based controller dedicated to a machine tool that permits the creation or modification of parts. Programmed numerical control activates the machine’s servos and spindle drives and controls the various machining operations. See DNC, direct numerical control; NC, numerical control.
- family of parts
family of parts
Parts grouped by shape and size for efficient manufacturing.
- gang cutting ( milling)
gang cutting ( milling)
Machining with several cutters mounted on a single arbor, generally for simultaneous cutting.
- lathe
lathe
Turning machine capable of sawing, milling, grinding, gear-cutting, drilling, reaming, boring, threading, facing, chamfering, grooving, knurling, spinning, parting, necking, taper-cutting, and cam- and eccentric-cutting, as well as step- and straight-turning. Comes in a variety of forms, ranging from manual to semiautomatic to fully automatic, with major types being engine lathes, turning and contouring lathes, turret lathes and numerical-control lathes. The engine lathe consists of a headstock and spindle, tailstock, bed, carriage (complete with apron) and cross slides. Features include gear- (speed) and feed-selector levers, toolpost, compound rest, lead screw and reversing lead screw, threading dial and rapid-traverse lever. Special lathe types include through-the-spindle, camshaft and crankshaft, brake drum and rotor, spinning and gun-barrel machines. Toolroom and bench lathes are used for precision work; the former for tool-and-die work and similar tasks, the latter for small workpieces (instruments, watches), normally without a power feed. Models are typically designated according to their “swing,” or the largest-diameter workpiece that can be rotated; bed length, or the distance between centers; and horsepower generated. See turning machine.
- milling
milling
Machining operation in which metal or other material is removed by applying power to a rotating cutter. In vertical milling, the cutting tool is mounted vertically on the spindle. In horizontal milling, the cutting tool is mounted horizontally, either directly on the spindle or on an arbor. Horizontal milling is further broken down into conventional milling, where the cutter rotates opposite the direction of feed, or “up” into the workpiece; and climb milling, where the cutter rotates in the direction of feed, or “down” into the workpiece. Milling operations include plane or surface milling, endmilling, facemilling, angle milling, form milling and profiling.
- process control
process control
Method of monitoring a process. Relates to electronic hardware and instrumentation used in automated process control. See in-process gaging, inspection; SPC, statistical process control.
- sawing machine ( saw)
sawing machine ( saw)
Machine designed to use a serrated-tooth blade to cut metal or other material. Comes in a wide variety of styles but takes one of four basic forms: hacksaw (a simple, rugged machine that uses a reciprocating motion to part metal or other material); cold or circular saw (powers a circular blade that cuts structural materials); bandsaw (runs an endless band; the two basic types are cutoff and contour band machines, which cut intricate contours and shapes); and abrasive cutoff saw (similar in appearance to the cold saw, but uses an abrasive disc that rotates at high speeds rather than a blade with serrated teeth).
- statistical process control ( SPC)
statistical process control ( SPC)
Statistical techniques to measure and analyze the extent to which a process deviates from a set standard.
- statistical process control ( SPC)2
statistical process control ( SPC)
Statistical techniques to measure and analyze the extent to which a process deviates from a set standard.
- tolerance
tolerance
Minimum and maximum amount a workpiece dimension is allowed to vary from a set standard and still be acceptable.